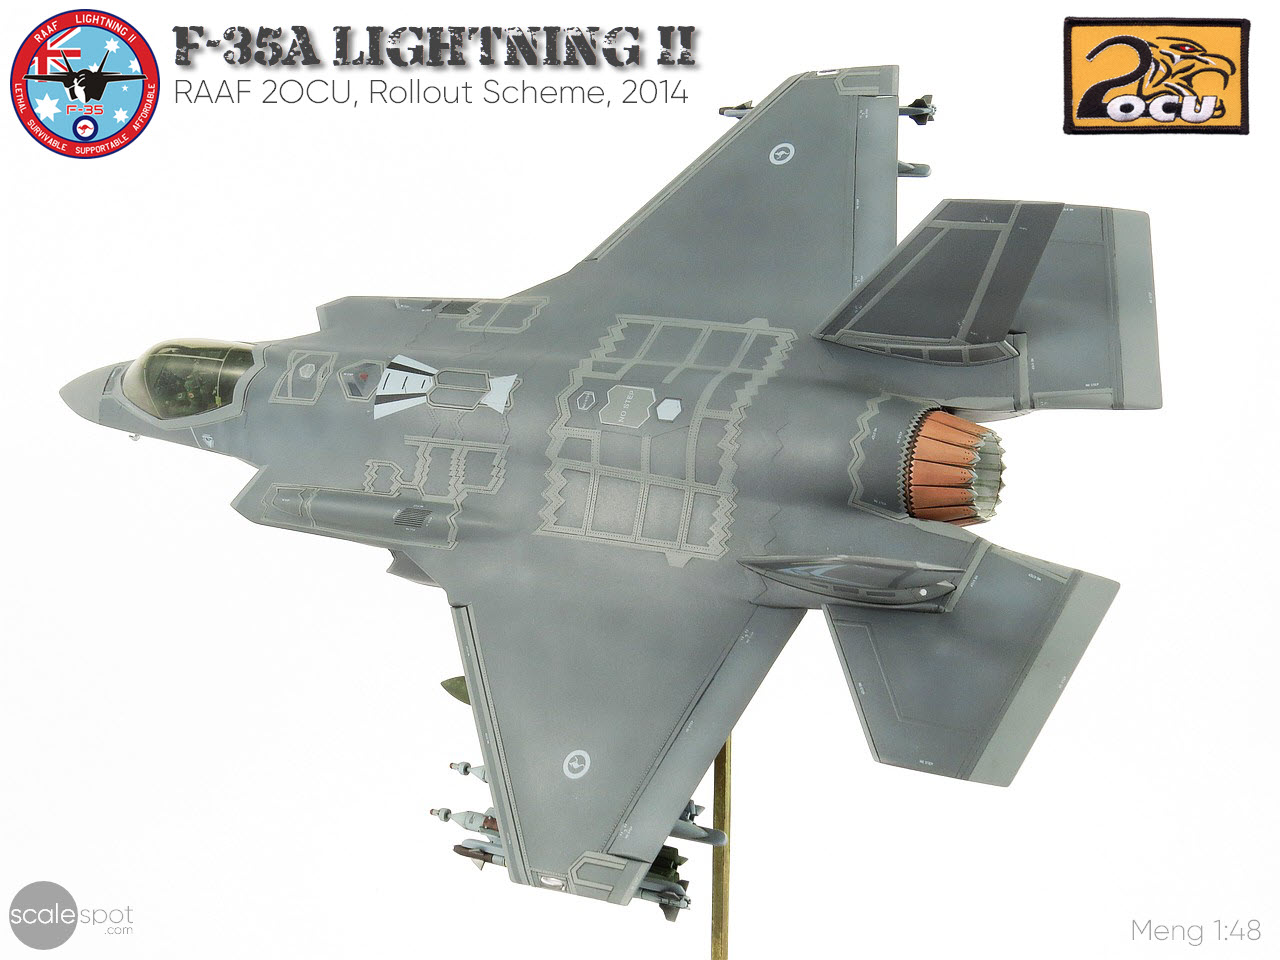
Lockheed Martin F-35A Lightning II
Meng (LS-007)
1:48
Started: Aug 2017
Finished: Feb 2018
Link to Gallery

The Lockheed Martin F-35 Lightning II is a family of single-seat, single-engine, all-weather stealth multi-role fighters. This fifth-generation combat aircraft is designed to perform ground attack and air defence missions
For my build of the 1:48 Meng F-35A kit I wanted to portray a Royal Australian Air Force (RAAF) F-35A which meant that I would need to source decals from outside the box. Having served in the RAAF for 9 years back in the 1980's when we received our first F/A-18A's I am following along with interest as this new strike fighter enters Australian service.

The F-35A Lightning II will provide for Australia's future air combat and strike needs. Australia has committed to 72 F-35A aircraft for three operational squadrons at RAAF Base Williamtown (3Sqn & 77Sqn) and RAAF Base Tindal (75Sqn), and a training squadron at RAAF Base Williamtown (2OCU). In the future, a fourth operational squadron will be considered for RAAF Base Amberley, for a total of 100 F-35A aircraft. The first F-35A aircraft is scheduled to be accepted into Australian service in 2018 and the first squadron, Number 3 Squadron, will be operational in 2021. All 72 aircraft are expected to be fully operational by 2023.
KIT OVERVIEW - Meng 1:48 F-35A Lightning II (LS-007)
Meng are not the first to release an F-35A in 1:48 with Kittyhawk having released their entire family (A, B and C) of F-35's several years ago. At the time that KH released their kits I jumped straight in to build a USMC B model. Suffice to say that I still have not finished that model as the KH kit was one of their first releases and had some 'issues'. So it was with some anticipation (having just finished the excellent Meng 1:48 P-51D) that I awaited the Meng F-35A release. Once I had the kit in my hot little hands I did a quick box review and concluded that Meng had pretty much nailed it once again.
Of course no kit is perfect (do people even still expect kits to be perfect?) and during my build I have added some detail, sourced some aftermarket decals and picked up some aftermarket goodies to make my build that much more enjoyable.
- Ronin Decals RAAF 2OCU F-35A delivery Scheme 1/48 (RDS-037)
- Ronin Decals RAAF 3SQN F-35A delivery Scheme 1/48 (RDS-139)
- Galaxy Models F-35A Lightning II Masks 1/48 (D48003)
At the time of writing there were also a number of other aftermarket sets either available or planned for the Meng kit. I won't be using any of these sets as I plan to build my model in flight (yes another pole sitter) but include them here for completeness:
- True Details F-35 Wheels Set 1/48 (48203)
- Eduard F-35A Lightning II Mask Set 1/48 (EDEX567)
- Eduard F-35A Lightning II Full Detail Set 1/48 (ED49864)
- Eduard F-35A Lightning II ZOOM Detail Set 1/48 (EDFE864)
- Eduard F-35A Lightning II Seatbelts STEEL 1/48 (EDFE865)
- IsraDecal F-35A RAM Panel Decals 1/48 (IAF104)
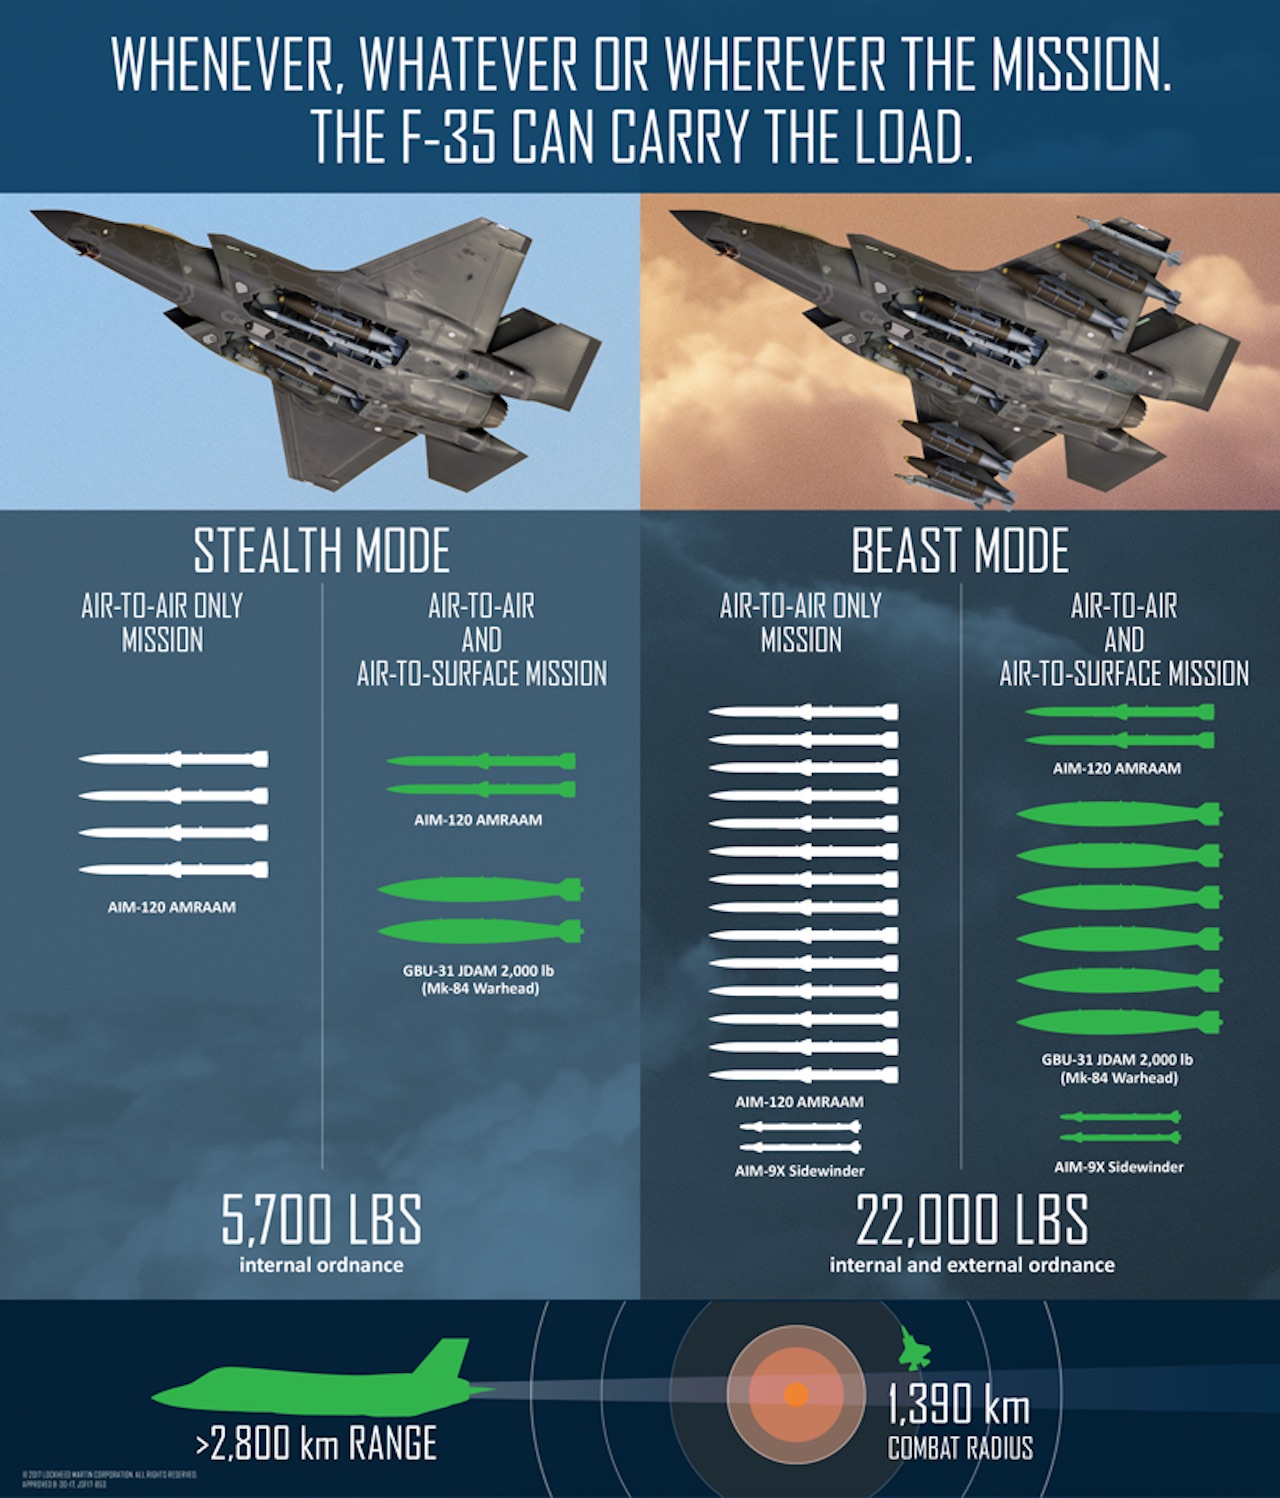
When most people think about the new F-35 they seem to focus on its 'stealth' characteristics and many of the scale models I have seen built (in all three scales) tend to show the aircraft in a totally clean 'stealthy' configuration. Always looking for something a bit different in my modeling projects I was attracted to building an F-35 in a Air Superiority configuration or what has been called Beast Mode
In such a configuration the aircraft essentially becomes a bomb truck with little on no concern for low observability or 'stealth'. Meng provides all the appropriate external pylons for each wing (3 per side) onto which ordinance can be fitted.
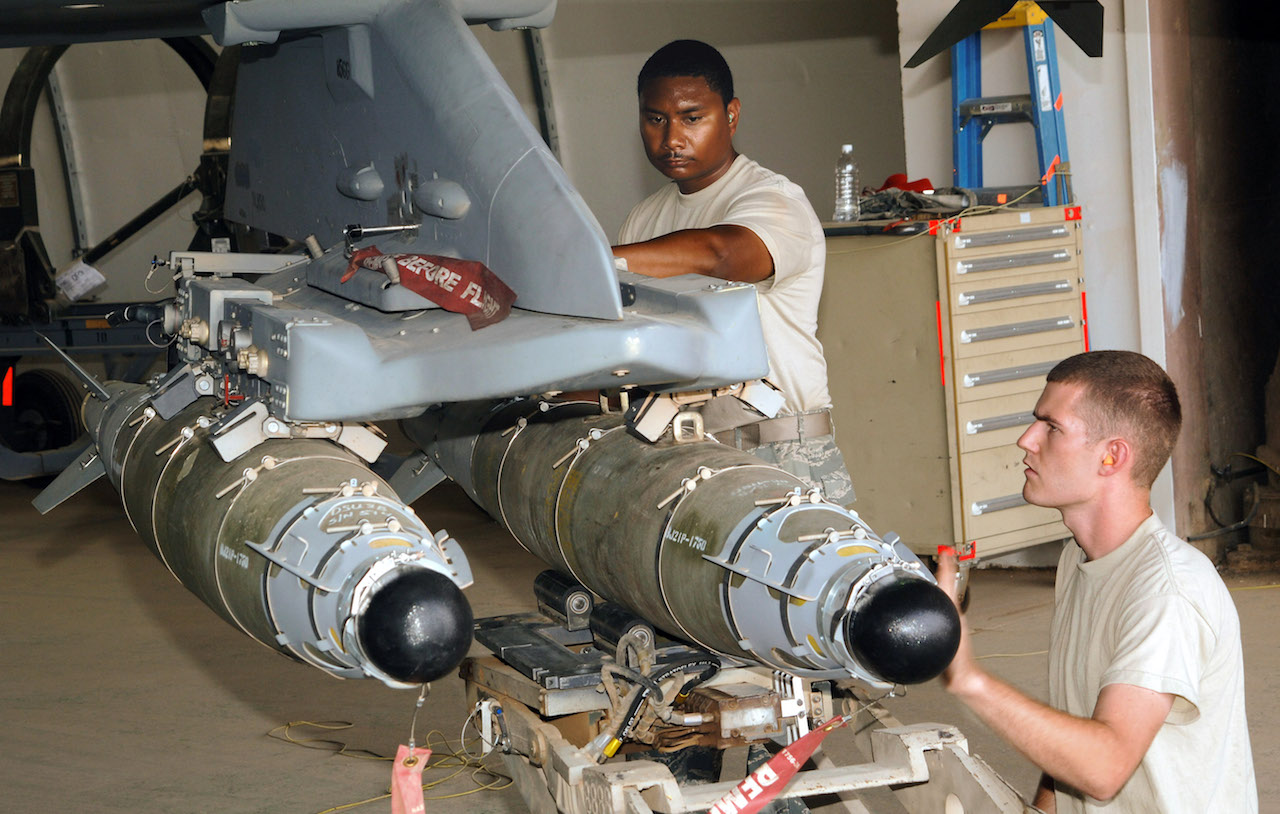
You can of course also model the main weapons bay open which allows for a lot of missiles and bombs to be carried in total. According to the specs around 22,000 lbs whilst still allowing for a combat radius of 1,390 km
Cleverly released at the same time as the first boxing of their F-35A kit, Meng has provided us with three (3) new sets of 1/48 modern aircraft weapons, many of which are planned to be fitted to the F-35 in the confined space of the internal weapons bay.
I will be using several of the weapons from these sets in my build, so we will get a close up look at them later.


The other challenge that will be faced by anyone building an F-35 is matching the exterior paint colors. You might think this sounds easy, after all several model paint manufacturers have already released colours in their range which are meant to match the new Camouflage Grey (FS36170) designated in FS-595 as the F-35 paint. In my testing of those 'out of the bottle' F-35 paints I have not found one that matches to my satisfaction the photos of real F-35's in the wild. Of course having said that the pesky 'Have Glass' finish applied to the F-35 also means that the perceived color of the paint can change dramatically as the lighting and camera angle changes. All in all this makes getting a realistic paint match to a real world F-35 very challenging indeed and as with most modeling tasks we will almost certainly have to be satisfied with a compromise.

BUILD - Meng 1:48 F-35A Lightning II (LS-007)
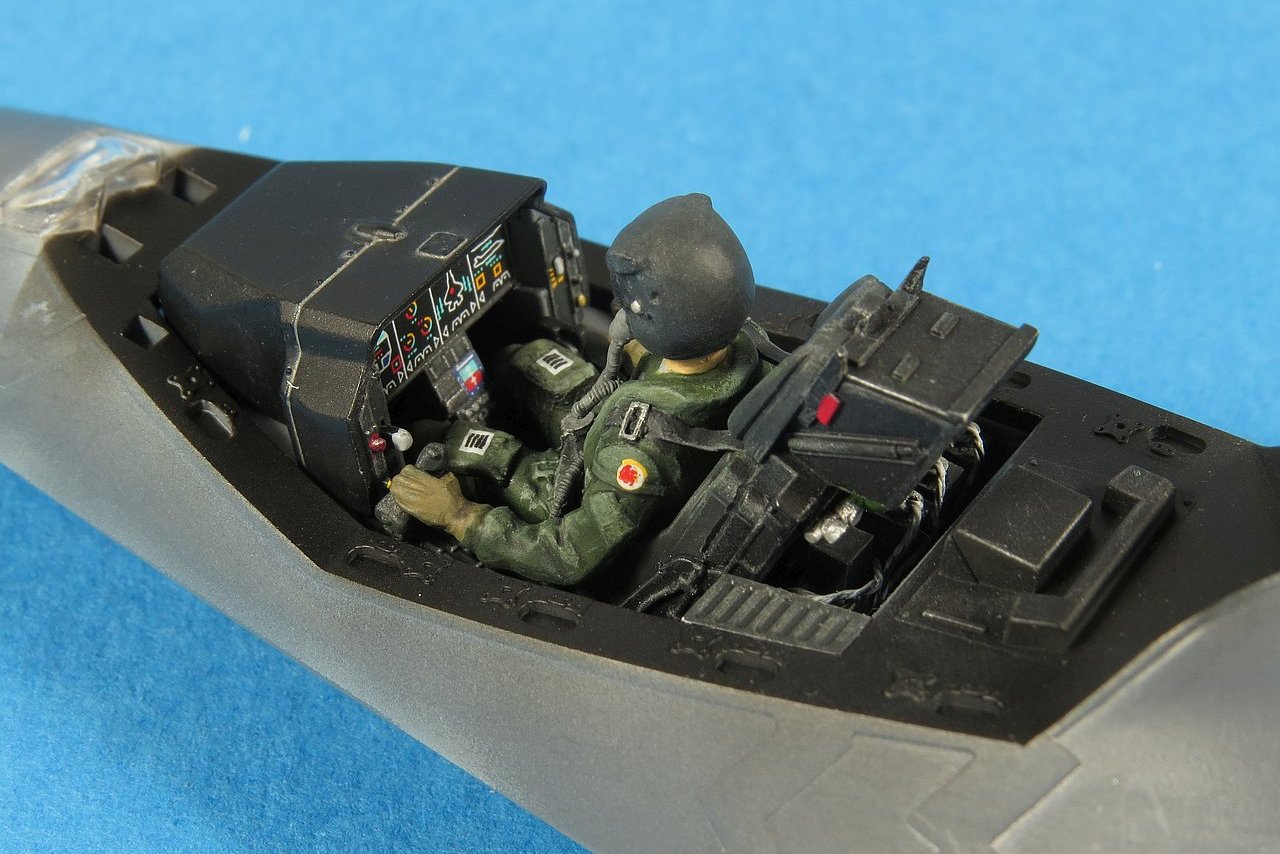
The Martin Baker US16E Ejection Seat is a further development of the Mk16 range that has already been successful with the T-6 Texan II, Eurofighter Typhoon, NASA T-38N and USAF T-38 upgrade programmes and other numerous aircraft platforms around the world. Meng has provided a seat which looks to be accurate and I only felt the need to add minimal detailing to tidy up the headrest and add an O2 bottle to the rear. As I am adding a pilot figure the photo etch harness will not be used.


Having a model in flight requires a pilot. Meng provides us with no pilot option so I raided one of my Kittyhawk F-35's and set to work on him with putty and copper wire. I was pleasantly surprised that the pilot figure fitted the Meng seat almost perfectly and all I had to do was some minor surgery on his arms and wrists to get them aligned with the Meng HOTAS controls. The oxygen hose was replaced with coiled copper wire, various belts/straps made from lead wire & Tamiya tape and assorted packs and pockets from Magic Sculpt putty.


The cockpit tub of the F-35 is very clean compared to just about any other modern fighter you care to name. Most if not all the cables and pipes that no doubt run along the fuselage are tucked away out of sight. The main screen (you'd hardly call it an instrument panel) is a single color touchscreen MFD and so requires very little in the way of detail painting.
After consulting a handful of reference photos I realised that Mengs 'all black' painting guide for the cockpit was not correct as the main part of the tub is in fact a pretty standard Grey with the upper cockpit sills and shroud being in black (as normal).
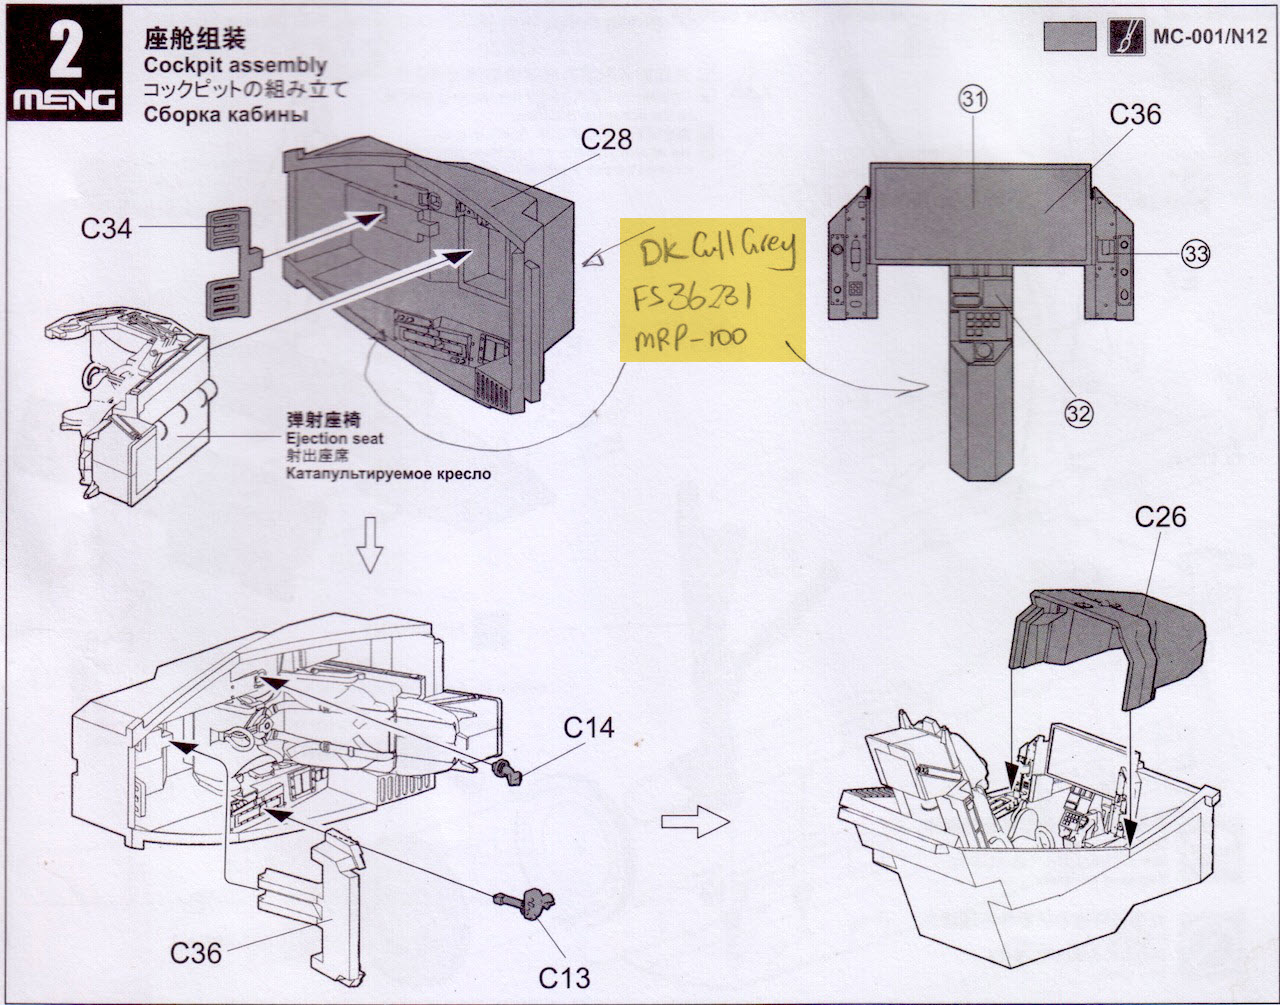
Here are a couple of good photos that show enough of the cockpit tub (for and aft of the seat) for us to make educated guesses to fill in the blanks. I painted the main tub using FS36231 Dark Gull Grey from Mr Paint. Also note the bright green oxygen bottle just visible on the back of the seat. This is not provided by Meng so some basic scratch building will help you out here if you want to use the kit seat.


Whilst I could not find any clear photos showing just what equipment was present on the shelf behind the seat I did see enough to allow me to make an educated guess and so some basic scratch-built box and cabling resulted. A little adjustment work was needed to get the seat and pilot with controls to drop fit into the tub, but once in place he looked right at home.


The tub, seat and pilot was now offered up to the fuselage for a test fit. The front shroud and IP was dropped in from the top and it all reassuringly clicked into place.

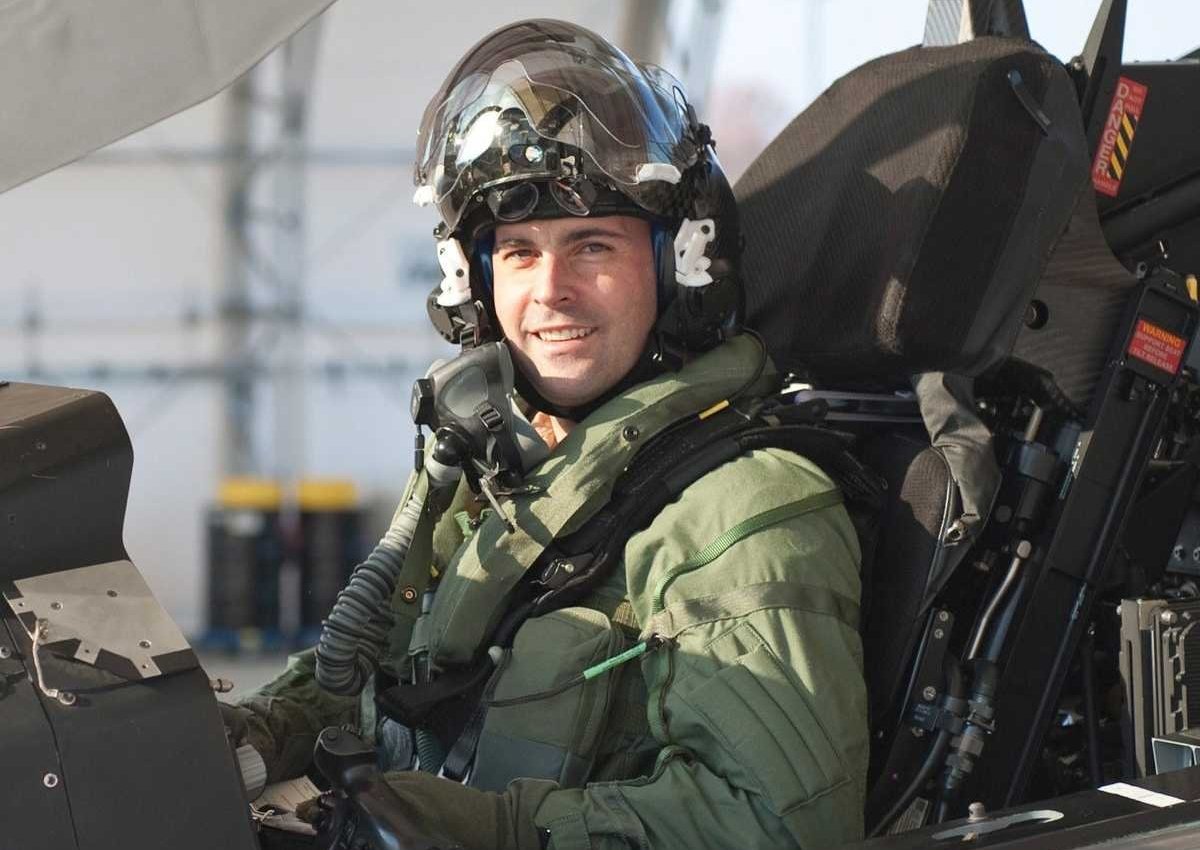
Painting was fairly quick and easy as the seat and upper cockpit are all black (Tamiya XF-85 Rubber Black). The pilots flight suit, gloves, helmet and mask were hand painted using Vallejo acrylic paints. A very subtle dry brush was applied to the seat, cockpit and shroud to lift the raised detail. You might be wondering where the HUD is, well the F-35 sends all critical flight information directly to the pilots Helmet Mounted Display (HMD) thereby rendering an external HUD unnecessary


If you plan to build your F-35 on the ground but would like to display a suitable pilot standing by then here are a couple of clear photos of the very nice figure from Plus Model (www.plusmodel.cz). I'll be using this guy in a future F-35 build.

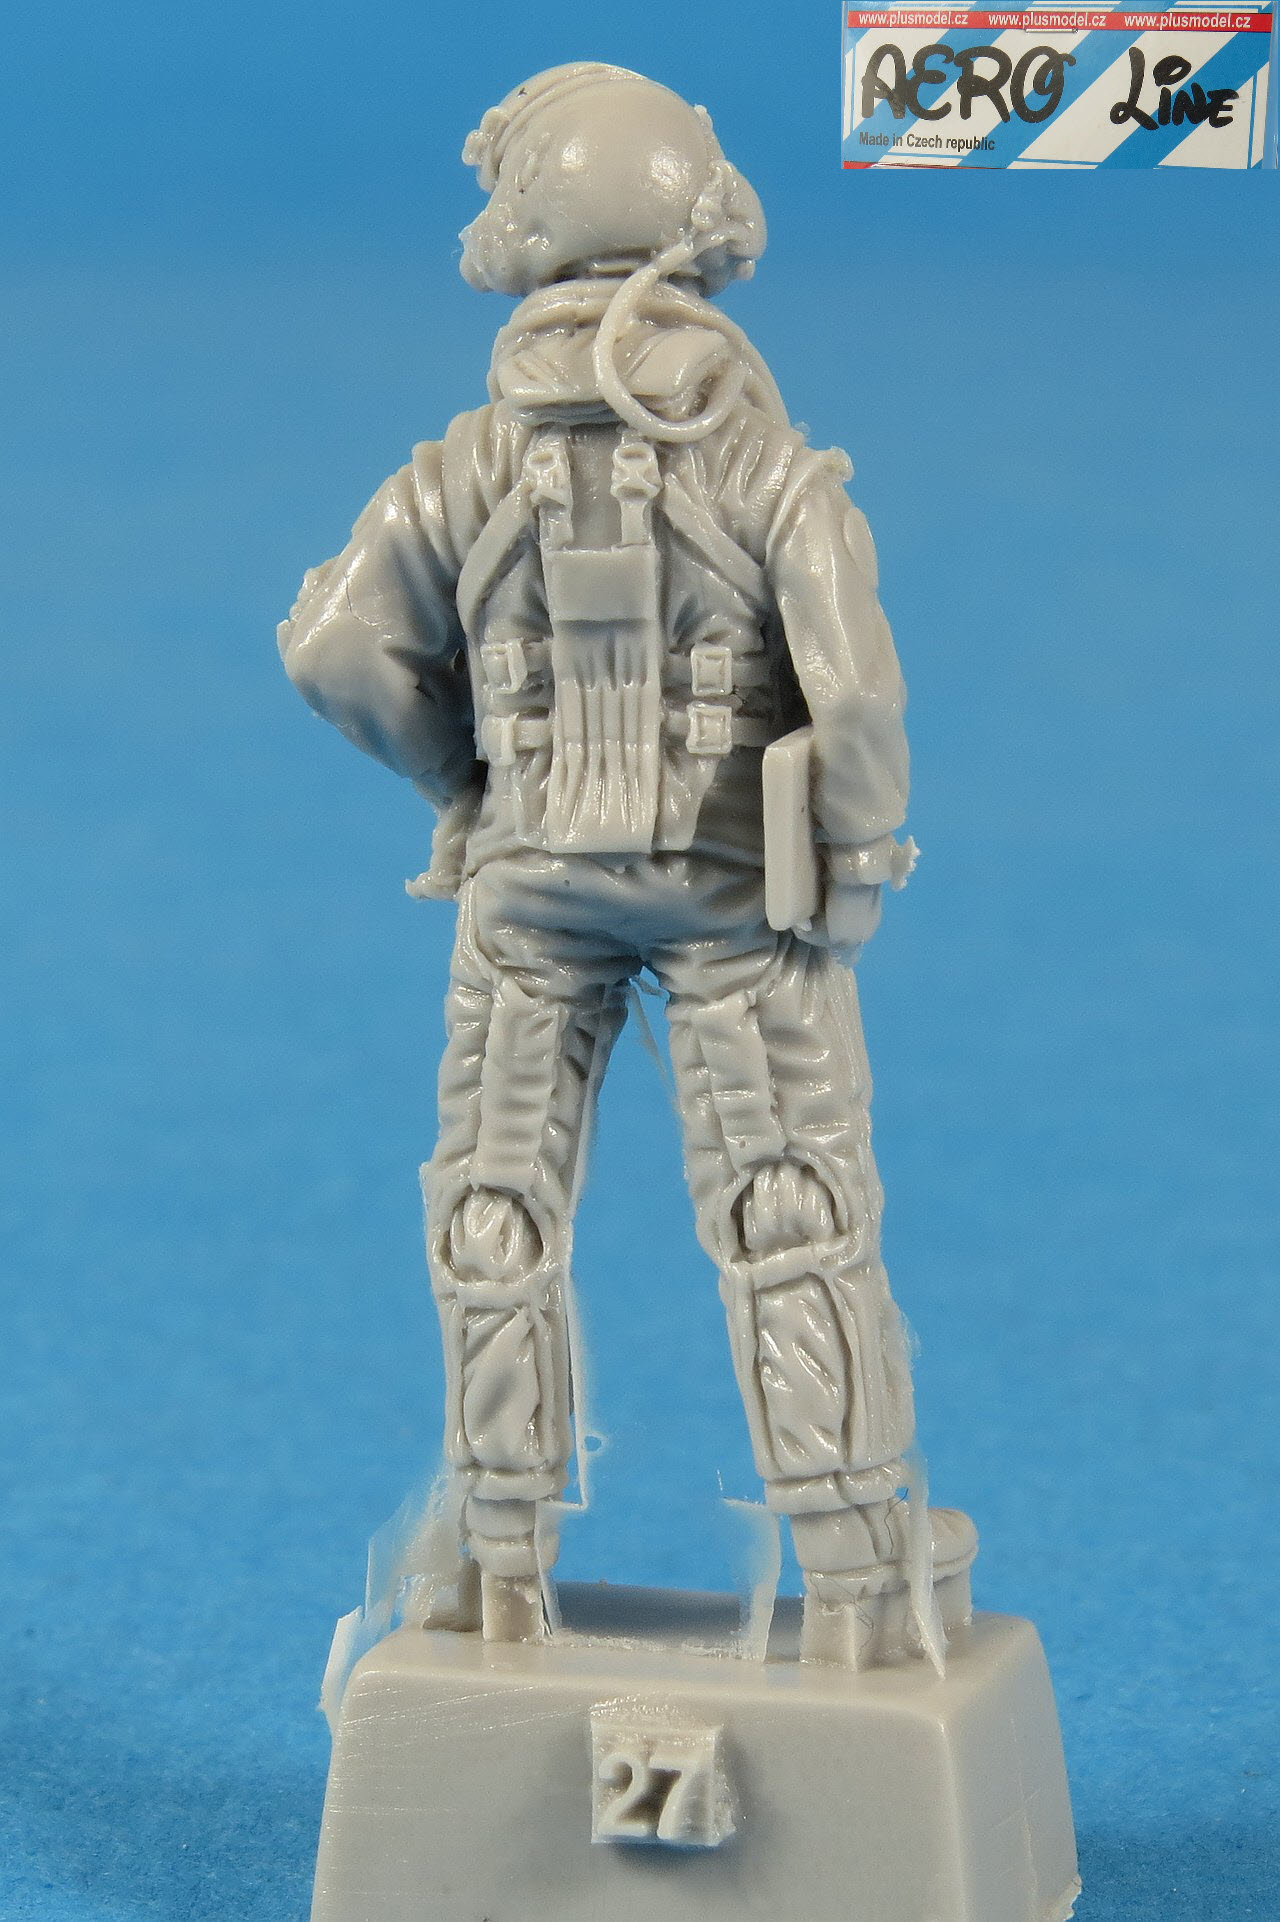
Just before we move on from the cockpit and crew here are a couple of photos to help when you paint and detail your figures.

Are you enjoying and finding value in this content? If so, please consider supporting my work by Buying Me A Coffee. Your support ensures that I can continue to provide high-quality, accessible content now and in the future, keeping this space free from distractions and focused entirely on the hobby we all love. Every little bit helps, and I truly appreciate your generosity!

My plan is to have my model displayed in flight in a very sharp turn, meaning that the bottom of the aircraft will be easily seen. With this in mind I absolutely wanted to have the main weapons bay open. I was a bit underwhelmed by the level of interior detail provided by Meng and decided to add some of my own based on what reference I could find. One thing to note is that the two bays are not symmetrical. To this end you should omit part F1 from the starboard bay as it looked to me to only be present in the port bay.


A quick comparison of the real thing with the Meng molded on weapons bay detail made up my mind on what would come next. When it comes to adding detail in areas like this I never try and match 'wire for wire' but rather try to add enough to the model to make it look 'busy' or 'full'. I also kept reminding myself that once the weapons were added much of the underlying detail would not be seen.

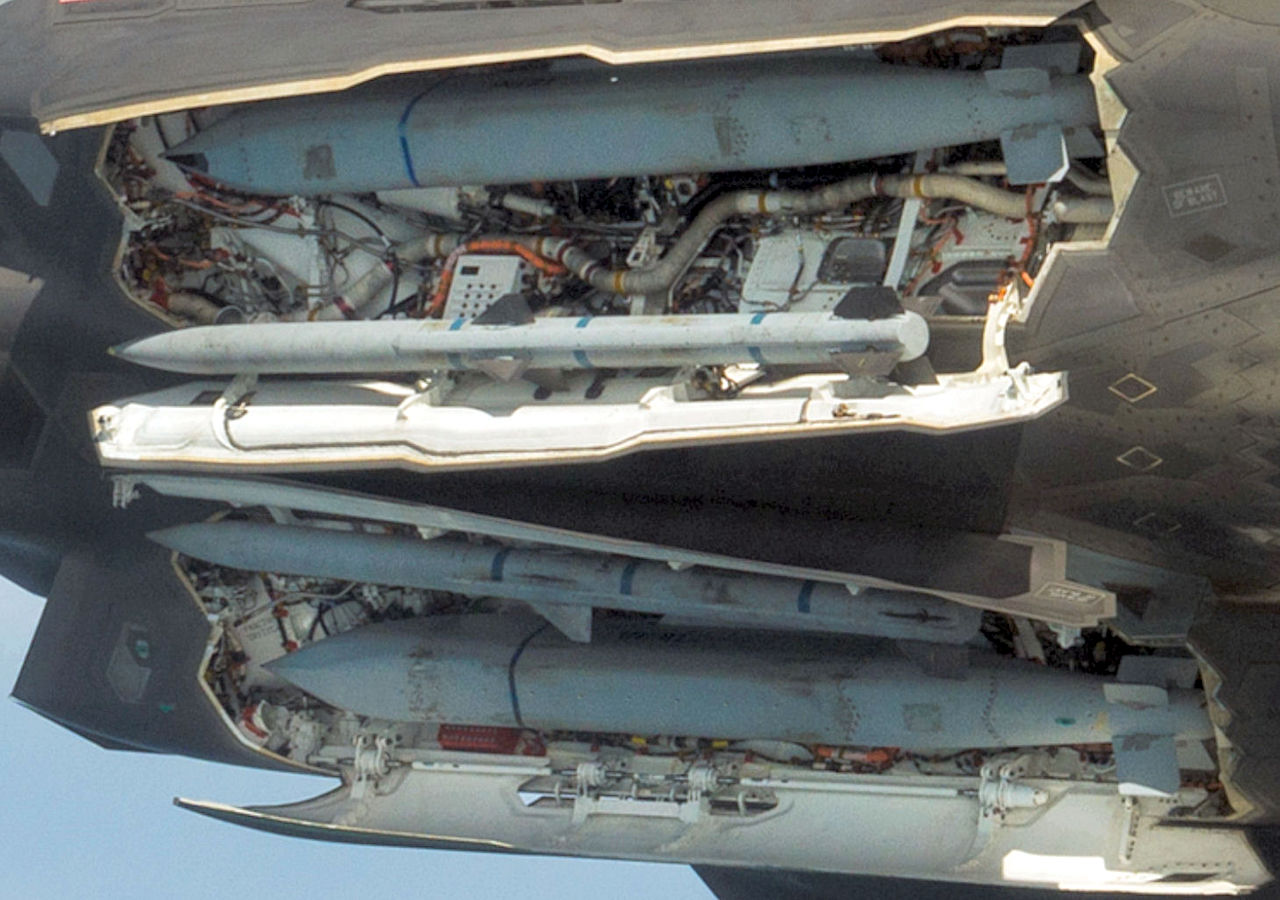
With electrical copper wire (of assorted gauges) in hand I started making looms or bundles to represent electrical cables which weave their way through and within the weapons bay. Thicker wire was employed for the hydraulic piping and strips of Tamiya tape used to simulate the insulation on the thickest pipes. As I mentioned before I like to use reference photos to give me a general sense of where cabling and piping run and then just used my imagination. I could have always added more, but decided that I had enough for my original objective of busying up the bays.

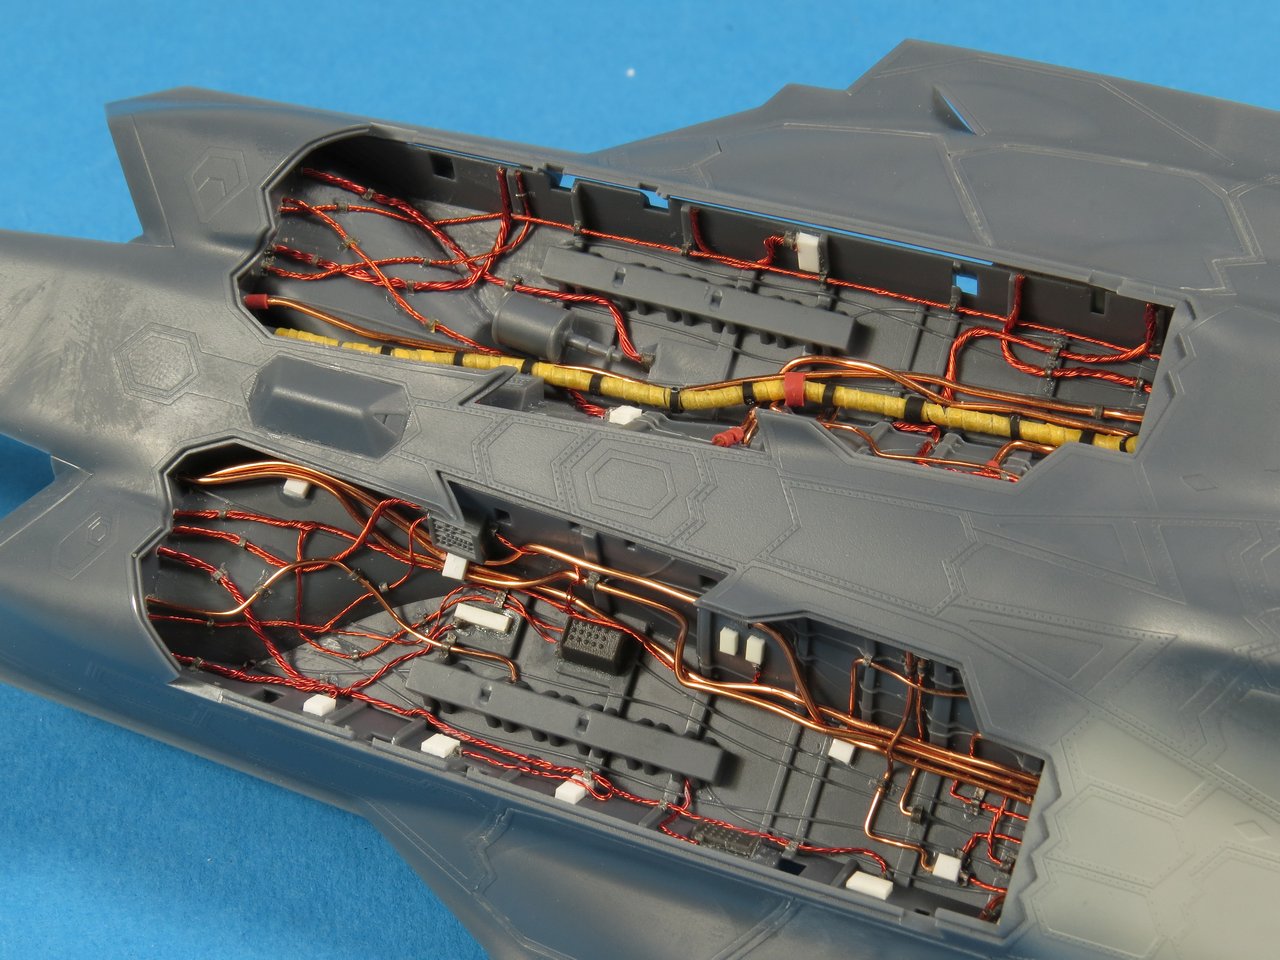


With the detailing work complete it was time for a coat of grey primer (Tamiya) to seal the metal parts and see how it looked. Next came a base coat of black (Tamiya X-18 Semi Gloss Black) over which I then painted the final white coat (Mr Paint). These days whenever I paint white I always use a Black base coat as I find it just gives the white more depth.


An hour or so of detail hand painting the cable and pipes and the weapon bays are 90% complete. I like to use Vallejo acrylics for hand painting and for metallic brush painting I have yet to find a better option than Citadel 'Games Workshop' paints.

The intake trunking of the F-35 is pretty well hidden and will be all but impossible to see on the model but nonetheless Meng provides a full set. The parts fit nicely with no gaps apparent and the join along the interior edges means that we can paint the interior white prior to assembly (which makes things so much easier). Part G7 represents the engine compressor face and is buried so deep in the model as to render it invisible.

The interior of the F-35 intakes are white (like just about every other modern military aircraft). I painted the two halves of each intake in white before applying glue as the mating edges are not really visible when complete and would not need sanding like most traditional rounded intakes. The forward section of the intake parts G19 & G18 actually form part of the fuselage during final assembly. I noted when dry fitting that these butt joints could be improved by the addition of a simple strip of 20thou card along the inside of the join. It provides a more positive alignment and strength.


This closeup shows more clearly the masking of the interior demarcation which I applied prior to assembling the outside halve of the trunking. Being able to do this made life much easier. The engine compressor face was sprayed with Alclad II Aluminium prior to attaching to the rear of the trunking.


Moving towards closing up the fuselage the next step is to paint and attach the engine exhaust, weapon bays and wheel wells. Unfortunately Meng has molded the engine exhaust tube (F14) as a single piece which makes it a bit of challenge to paint properly. If you use the photo etch part (W2) which covers the exhaust tube completely then you probably don't need to worry about painting the tubes interior. I however could not find any supporting reference photos that showed any such part as indicated by Meng so I left it off which meant I had to find a way to paint the interior properly.

The nozzle for the F-35 consists of a complex series of overlapping serrated petals which seek to maintain a low radar signature. The interior plates seem to be a familiar ceramic covered white finish, essentially the same as found on most other contemporary US manufactured engines. The Meng exhaust looks to me to be a very good reproduction and will need some fine masking of the petals to match the colours found on the real engine.


To allow me access to the interior of the exhaust tube and the rear engine blades I used a razor saw to simply cut the end off. This allowed me access with the airbrush to both ends of the tube. Once painted I just glued the end back on before securing the whole assembly into the fuselage section. I would recommend that you ignore the Meng assembly sequence here and leave the nozzle (part F3) off until the end of the build. The fit of the weapon bays was very good with only a small amount of pressure being applied as the glue set. Note that because my model will be in flight I did not assemble or attach the undercarriage bays. The wheel well doors however were glued shut and I'm happy to advise the fit was again gap free.


Just forward of the nose wheel well, integrated into the F-35 Lightning II's fuselage with a durable low-drag sapphire window is the stealthy Electro-Optical Targeting System (EOTS). As the first sensor to combine forward-looking infrared and infrared search and track functionality, EOTS enhances F-35 pilots' situational awareness and allows aircrews to employ short-wave infrared, high-definition television, and high resolution laser to identify areas of interest, perform reconnaissance and precisely deliver laser and GPS-guided weapons. Be sure to paint and install part F22 into the lower fuselage interior at this point. The clear faceted window will be added and masked later prior to painting.


Are you enjoying and finding value in this content? If so, please consider supporting my work by Buying Me A Coffee. Your support ensures that I can continue to provide high-quality, accessible content now and in the future, keeping this space free from distractions and focused entirely on the hobby we all love. Every little bit helps, and I truly appreciate your generosity!
With the underlying weapons bays installed its time to secure the intake trunking and main wheel wells into the fuselage. Alignment tabs are provided along the centerline of the lower fuselage halve to ensure the intakes sit correctly in relation to the lips and forward fuselage section. The forward section of the intake assembly also forms part of the forward fuselage and so care needs to be taken when gluing these as the seams fall on natural panel lines.

As mentioned previously I had applied some plastic strip along the forward butt joint to provide accurate alignment and strength in the join. With the intake sub-assembly held in place I applied liquid glue from the inside of the seams and gave them a moment to set up. Some small amount of glue can be used to secure the outer walls of the intake trunks to the fuselage as well.


Step 14 requires us to make a couple of choices in the way we model our F-35. First up you need to decide if you plan to have the refueling doors open (parts F4 & F8) or closed (F5). You also need to decide if you will attach the Luneberg Reflectors parts (F23/F24). These are designed to increase the F-35's radar signature several hundred times, so that when flying in peacetime inside normal airspace the F-35 will be clearly visible to civilian air traffic controllers. The Luneberg lens sit inside four small domes fitted to the top and bottom of the F-35 airframe and they are the most efficient passive radar reflector available and require no power supply nor maintenance. Part H6 (in clear plastic) is also installed at this point and will need some masking prior to painting
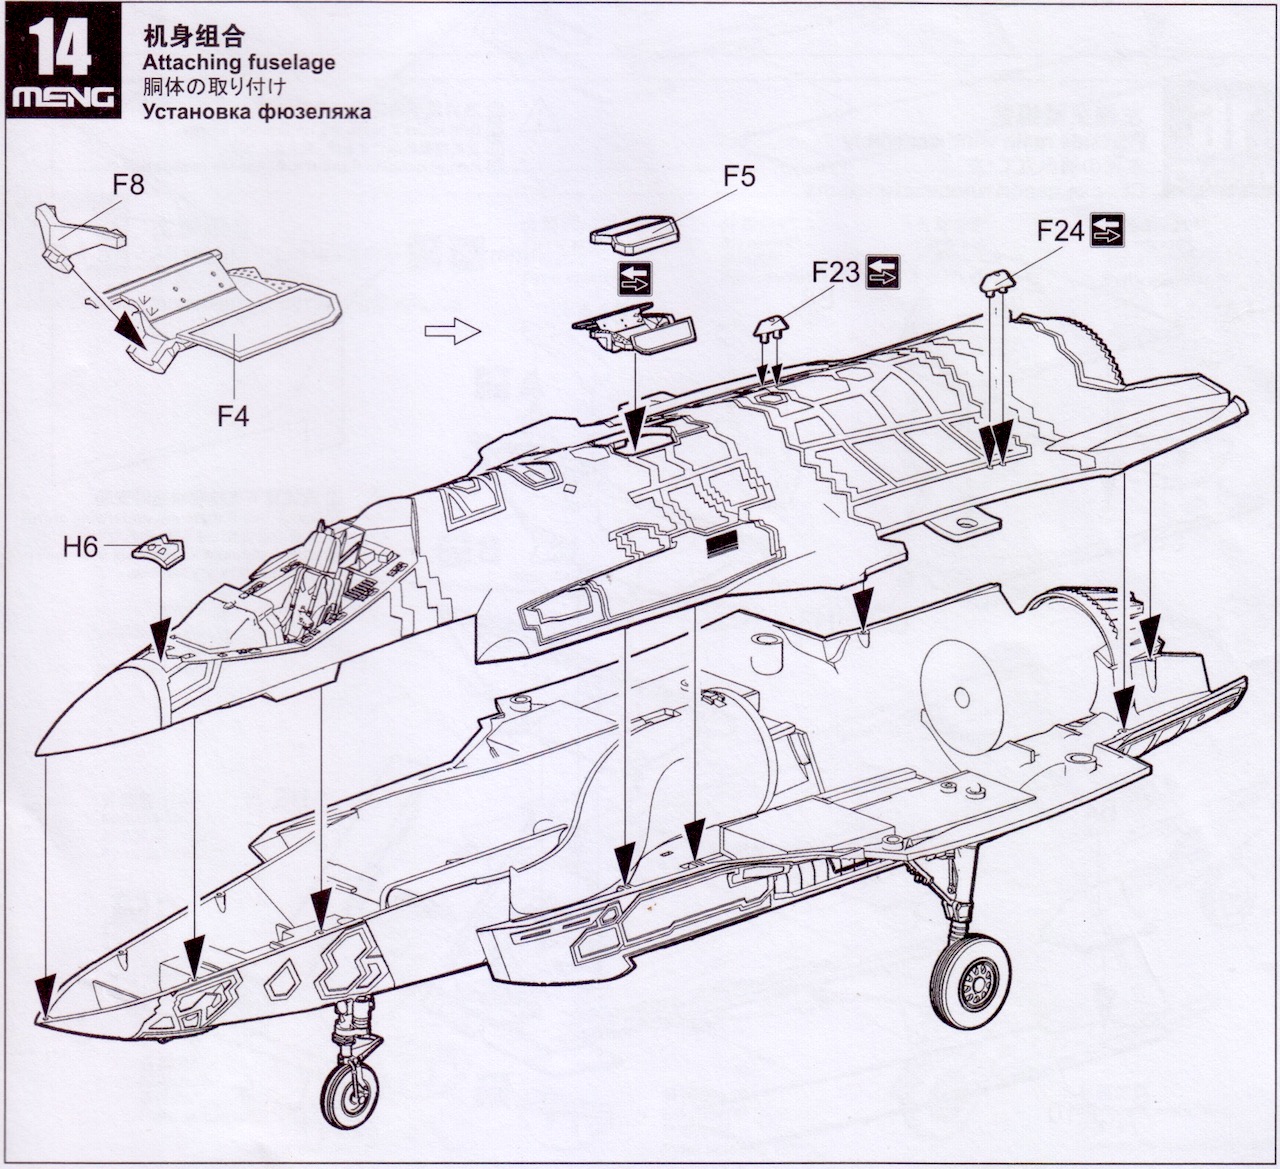
In general the fit of the top and bottom fuselage halves is very good. Because the seam runs along a narrow angled mating surface which runs the length of the airframe I did find a few gaps appearing where the liquid glue did not penetrate. Here I have sparingly applied super (CA) glue as a filler and it will be sanded to remove the gap.

Part H6 is provided in clear plastic is so that we can accurately depict the two sensors mounted in this location. I am not 100% certain but I believe that at least one of the sensors forms part of the AN/AAQ-37 Distributed Aperture System (DAS). You will need to paint and mask the hexagon shaped sensor as well as the truncated triangular sensor seen in the close up photo. If like me you use the Galaxy Models pre-cut mask set then both these masks are provided ready to apply (too easy).


With the fuselage complete its time to focus on the wings and tail. Meng kindly provide two options for displaying the all moving horizontal tail planes. You can opt for the tail to be displaced by 0 degrees (ie neutral) or 10 degrees. Select and install the appropriate spacers onto the very rear tail section. The wings are a simple top and bottom assembly and if like me you plan to use the external pylons be sure to pre-drill the mounting holes before gluing the wings together.

I have included these two reference photos to highlight that there are no seams or panel lines present on the F-35 along the wing roots, either top or bottom. This will require us to completely remove the wing to fuselage seams and care will be needed to ensure we don't damage any of the raised RAM panel detailing on the models surface.


Starting with the upper seam, my first step was to remove the RAM paneling that extends from the center section towards the wing leading edge. I could not find any reference photos that had this present. As its raised only a light sanding was needed to remove it prior to filling the seam with Tamiya Basic putty.


The lower wing join required a bit of care to not damage the surrounding detail. I quite often use masking tape as protection as shown here when nearby delicate detail is in danger from my sanding efforts.


A couple of fairly generous layers of Tamiya Basic Putty were applied to the wing root seam. This section incorporates a blended curve where the fuselage merges into the wing and so you need to have a light touch with the sanding stick to ensure the curve is maintained while eliminating the seam. I had to apply a couple of layers of blended filler before I was happy with the result.

I'm very much an advocate of using sprayable filler/primer (like Alclad or Mr Surfacer) to check the progress of your seam work. It's not until you get a coat of primer on work like this that you can truly tell if the seam is gone or not. The proper sprayable primers adhere to the plastic so well that you can confidently apply putty over top of them to correct any issues you find.


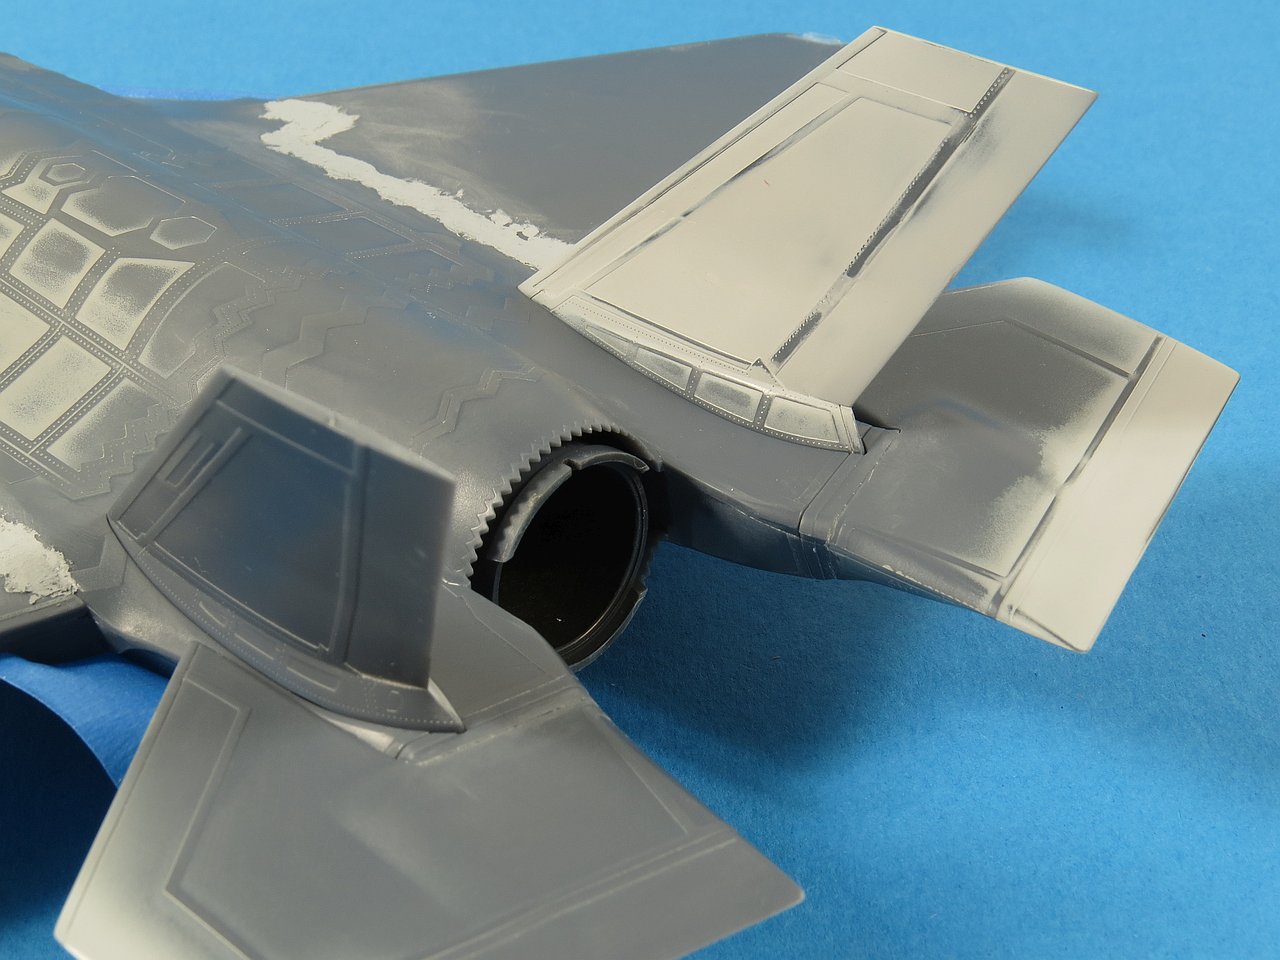
The empannage (the stabilizing surfaces at the tail of an aircraft) for the F-35 consists of two vertical fins and two all moving horizontal stabilizers. In most 1/48 models its normal for these parts to be molded in two halves with the seam running along the edge as this makes gluing and seam removal fairly painless. Unfortunately Meng have decided to break with that standard engineering practice and have placed the seam for the vertical fins right along the middle of the fin, a seam that is very hard to remove due mainly to it running directly over the raised RAM panel details. The horizontal stabilizers likewise have a join along the surface of the part bit thankfully it is not impacted by any raised detail.

I considered a number of different options for dealing with this annoying (and frankly easily avoided) seam and in the end just tried my best to fill the join with filler and sand around the raised panelling. The result was 'OK' but still frustrating as it could have been so easily avoided had Meng just molded the two halves of the fin so the seams were along the edges. I'm not sure if it's a coincidence but Kitty Hawk did exactly the same thing on their F-35 kits (even then it was a silly idea).


The horizontal stabilizers are a nice click fit and I smoothed over the resulting tiny gaps with moist Milliput to reproduce the 'edge' free surface of the stealthy F-35. I plan to leave the vertical fins off during main painting as they are near perfect drop in fit and so will not need any filler.

When attaching the vertical fins (before or after main painting) the fuselage top has correctly sized/shaped mounting slots which do a good job of firmly holding and positioning the fins at the correct angle. As previously mentioned I decided that the fit of the fins is good enough to allow them to be painted separately and then attached at the end of the build. This should make masking and decaling considerably easier.

The vertical fins are shown loosely dry fitted to the fuselage. No glue has been used here as I will paint/decal them separately, then attach.

Meng has allowed for the forward opening canopy of the F-35 to be displayed in the open of closed position. Interior framing is provided (part C25) as is the canopy explosive detonation cord molded onto the inside of the clear canopy part (H1). The kit provided canopy is molded in clear plastic with no attempt by Meng to replicate the tinting found on the real F-35.

In keeping with most other modern US fighter canopies, the F-35's massive canopy is treated with tinting and is quite distinctive on photos of the real thing. I have used 'clear' paints before to apply a tinting to canopies via airbrushing and was happy to use the same technique again here.


Most model paint manufacturers include at least a handful of 'clear' colors in their range and most aircraft modellers will end up using them for navigation lights etc. Using the same paints on a canopy is a little bit different in that you will want to airbrush the tinted paint onto the canopy rather than dip or brush paint it on. For the F-35 tinting I chose (after some experimentation) a mixture of Tamiya X19 Smoke and X24 Yellow. The ratio I settled on was 10 drops of Smoke to one drop Yellow. To thin the paint for airbrushing I used Tamiya's own Lacquer thinner (you could use their own Acrylic thinner) as I find this makes the paint dry quicker and with a harder shell. I applied three very light misted coats over the outside of the canopy (which had been cleaned thoroughly) and then placed it in an airtight container to dry.

When the tinting was dry (leave for a couple of days to be sure) I set to work on the inside by masking the 'det cord' which Meng provide raised on the interior. Small strips of Tamiya tape were used for the masking. If you trust your hand painting skills more then I trust mine you could probably avoid all this masking.


The cord was sprayed with some Mr Paint Primer (light grey) as I wanted to be sure the paint adhered to the shiny surface of the clear canopy. When the tape was removed the Det Cord was now far more visible from both the inside and outside than previously.


Are you enjoying and finding value in this content? If so, please consider supporting my work by Buying Me A Coffee. Your support ensures that I can continue to provide high-quality, accessible content now and in the future, keeping this space free from distractions and focused entirely on the hobby we all love. Every little bit helps, and I truly appreciate your generosity!
If you plan to load up your F-35 with external weapons then Meng has you covered as they provide a full set of pylons. In terms of weapons provided in the box you get:
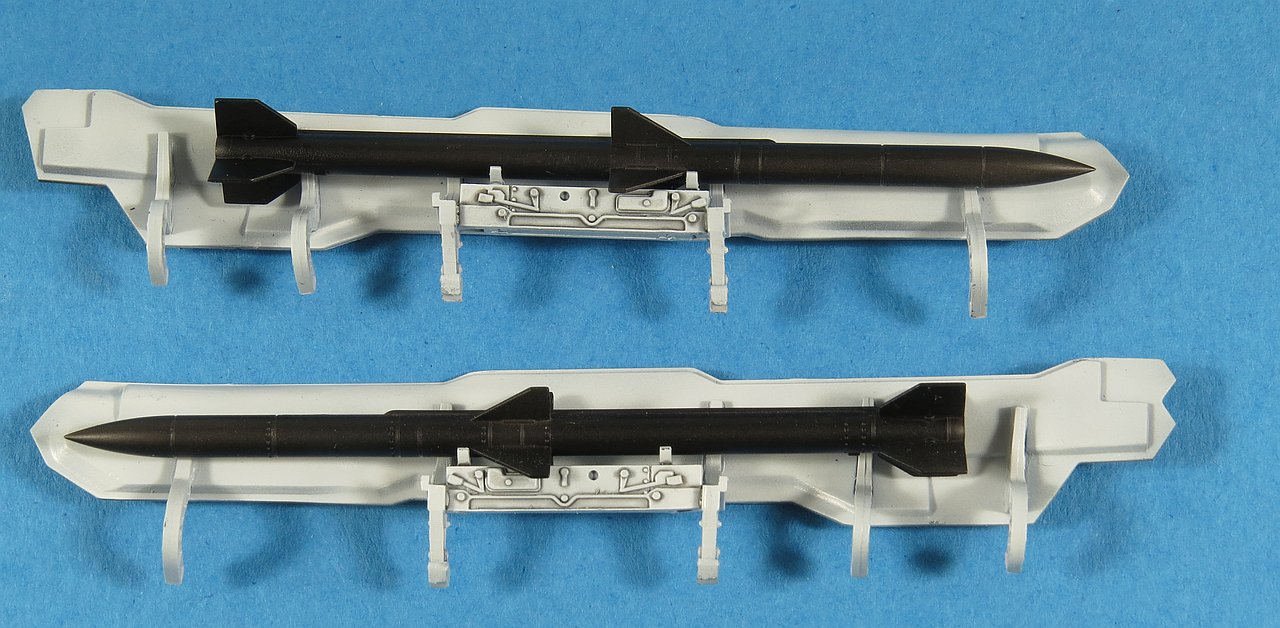
- AIM-120C AAMRAM x 2
- GBU-53 SDB (Small Diameter Bomb) x 8
- BRU-61 SDB Pallet x 2
This weapon combination is designed to fit in the internal weapon bays so any ordinance you plan to load onto those external pylons will need to be sourced elsewhere.

Installing the pylons is easy as all you need to do is remember to drill out the locating holes prior to gluing the wings together. The fit of the pylons to the wing is very good so I plan to leave them off during main painting and attach at the very end.


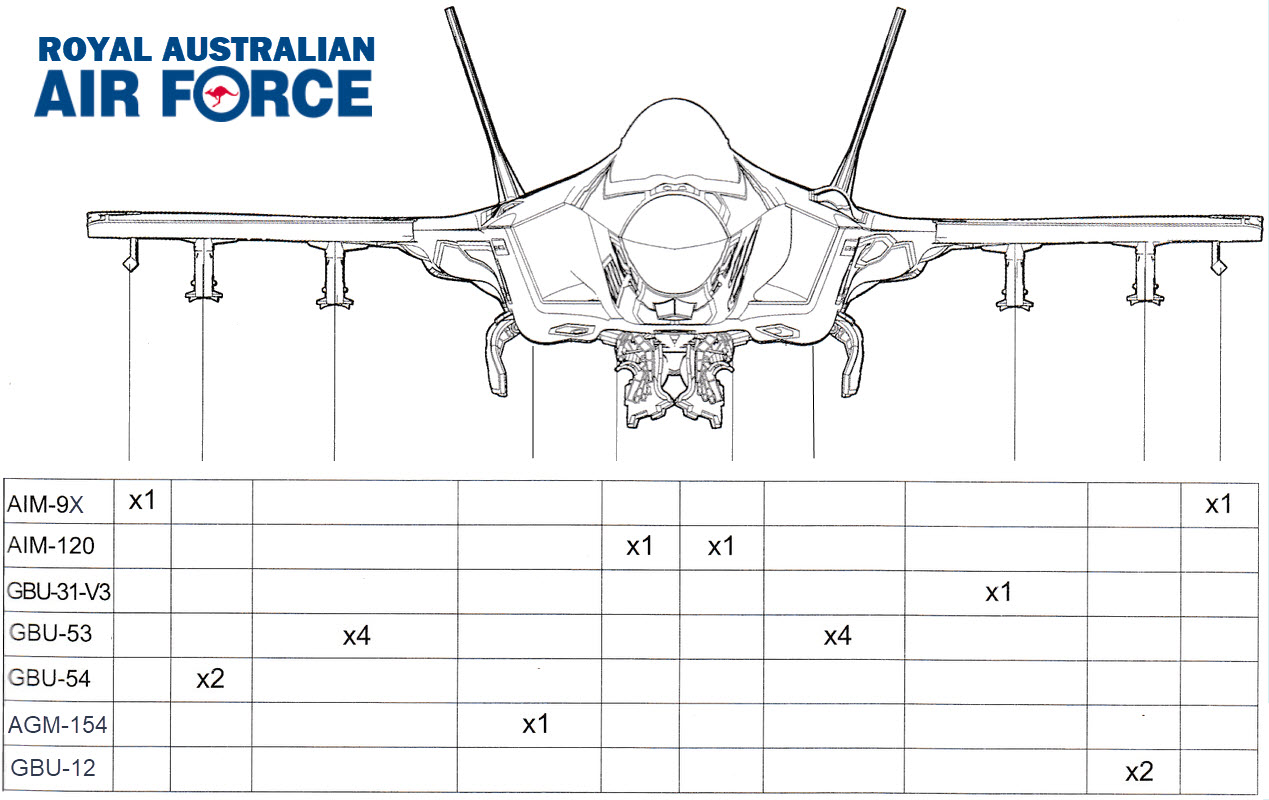
So if we have to source our external weapons load-out the first step is to determine what weapons are appropriate now (or in the future) for an RAAF F-35A. I compiled the load-out diagram below based on research into what ordinance the RAAF already have in use (mostly on our Super Hornets) and what we have requested to procure from the US (eg we have ordered 3900 x GBU-53 SDB's). I want to stress that this load-out is just an educated guess by me to try and make my F-35 look as mean as possible.
To fill up my "Beast Mode" F-35A I sourced the extra weapons I needed as follows:
- AIM-9X Sidewinder (Meng SPS-043 US Short-Range AA Missiles Set)
- GBU-31-V3 2000lb JDAM (Meng SPS-045 US Satellite Guided Bombs Set)
- GBU-54 500lb JDAM (Meng SPS-045 US Satellite Guided Bombs Set)
- AGM-154 JSOW (SkunkModels 48006 US/NATO Modern Weapons Set)
- GBU-12 500lb Paveway II LGB (Hasegawa X48-8 Aircraft Weapons D - US Smart Bombs & Target Pods)
- BRU-57 Multiple Carriage Bomb Rack (Eduard Brassin 648 358)
To make sure everything fitted the way it should I assembled the weapons and pylons followed by a complete dry fit. I did this at an early stage to allow me to make any necessary adjustments or corrections before committing to glue and paint.

Meng have released three new modern US weapon sets to coincide with the release of their F-35 kits. As you will see from the close up photos of my build the weapon parts are extremely well detailed and provide us with several type of ordinance only previously available in resin.
The F-35's outer most pylon is suitable only for use by AA missiles such as the AIM-9X and AIM-120 AAMRAM. I wanted to use an asymmetric load configuration (it just looks way more interesting) and really like the BRU-57 Double Adapter rack. With this in mind on the port wing I placed the larger GBU-31 2000lb JDAM on the inner pylon (higher weight capacity?) whilst the two 500lb GBU-12's and BRU-57 occupied the center pylon.


On the starboard wing I decided to put a BRU-61 pallet loaded with 4 x GBU-53 SDB's. These would most likely by carried in the internal bays but I wanted to get them out on the wing so the detail could be appreciated. An AIM-9X on the wing tip and the two GBU-54's (with BRU-57 adapter) on the center pylon to balance things out.

This left only the internal weapon bays and I had seen photos (including one of an RAAF bird) loaded with the AGM-154 Joint Stand Off Weapon. The second SDB pallet belonged in the other weapon bay and so my load-out tweaking was done.

Included in the box are two full sets (8 in total) of GBU-53 SDB's and their BRU-61 pallets (4 bombs per pallet). I felt that the plastic mounting pins provided were not really secure enough to give the sub-assembly any real strength and so I did my usual trick of supplementing with brass pins.

This photo gives a good breakdown of the extra work I did to the pylon and weapons to give them more secure locating pins. The brass sway braces were sourced from my spares drawer (Reheat from memory). I always pin weapons as it allows me to sort out any alignment issues (nothing more distracting than a crooked bomb) early on.

The dry fit assembly of the full stack shows how the bombs fit to the pallet adapter and how the adapter fits to the pylon. The included reference photo is not an F-35 but in fact a F-15E Strike Eagle, however it does show the spacing of the bombs, adapter and pylon very nicely.


Here we see the Meng GBU-54's together with their allocated BRU-57 rack. The Eduard Brassin BRU-57 is a work of art and it has so much detail its almost a shame to attach the bombs. Notice the bombs are pinned to the rack and the rack to the pylon.

Depending on what doors you have open, now is the time to assemble them. For me I only needed the weapons bay doors as the undercarriage was retracted. Be wary of the incorrect labeling for the inner weapons bay doors in the Meng instructions at step 24 as it's a bit misleading (see the highlighted hand written corrections I made).
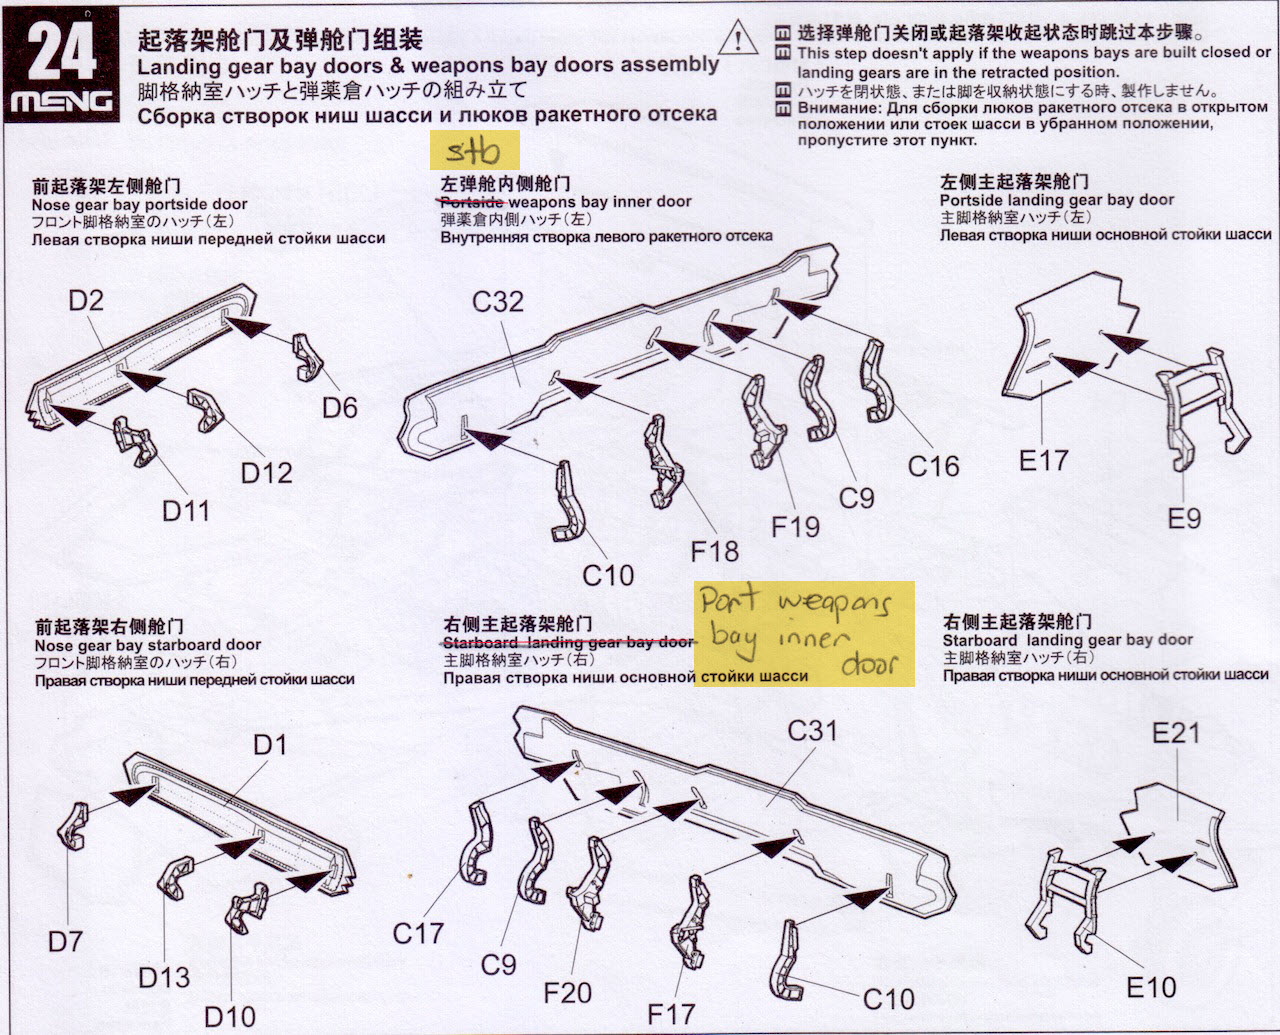
The inner doors have the mounting point for the internal AIM-120C missiles. The missile adapter pylon is located between the two middle hinges for the door so when you are gluing on the hinges have your pylon handy to dry fit between them to make sure the spacing is correct as the glue dries.
Test fitting of the doors revealed no problems and these will now be set aside until final assembly. I also just noticed that this photo revealed that I missed sanding off the seem on one of the hinges (shhh, don't tell anyone).

The large outer weapon bay doors are also supported by several heavy hinges. The hinges are connected by a rod which Meng provides as part F11. After fitting F11 to the hinges I decided that the plastic rod would look more convincing in brass and so replaced this part on both doors.

The outer doors carry no missiles and are just fairly plain. I'll apply a light wash to give a bit of interest to the otherwise flat looking surface. I'm also happy that it looks like I managed to clean up all these hinges without leaving any seams behind

A test dry fit shows everything to be ship shape. The brass rod has been hand painted with Citadel Mithril Silver.

With construction all but complete it's time to get serious about painting and markings. At the start of this build I had planned to use markings for one of the very first F-35A's delivered to the RAAF. A35-001 and A35-002 have been assigned to No 2OCU (Operational Conversion Unit) and I obtained the decals for these aircraft from Ronin Graphics, one of our excellent local decal manufacturers here in Australia. These decals are hand silk screen printed, meticulously researched and include all the stenciling. Before I got to the actual painting stage, the RAAF took delivery of our 3rd and 4th aircraft (A35-003 and A35-004) which have been assigned to No 3 Squadron, the first of our actual operational squadrons to be equipped. Ronin Graphics were again super quick off the mark and had the new decals ready within weeks.

There is not really a lot of differences between the paint schemes of F-35's, regardless of what country you end up depicting. One thing that has been noticed recently is that newer aircraft coming off the production line have RAM paneling that is far more subdued where the RAM color almost matches the rest of the airframe. The newer RAAF aircraft (003 & 004) seem to be like this and to be honest I find it a little boring in that they are pretty much one color all over. The RAM paneling does help to add visual interest to the model and so I decided to stick with the 2OCU scheme I had originally planned on. One other thing worth mentioning for those planning to build an RAAF aircraft, the Kangaroos on our roundels ALWAYS face forward.

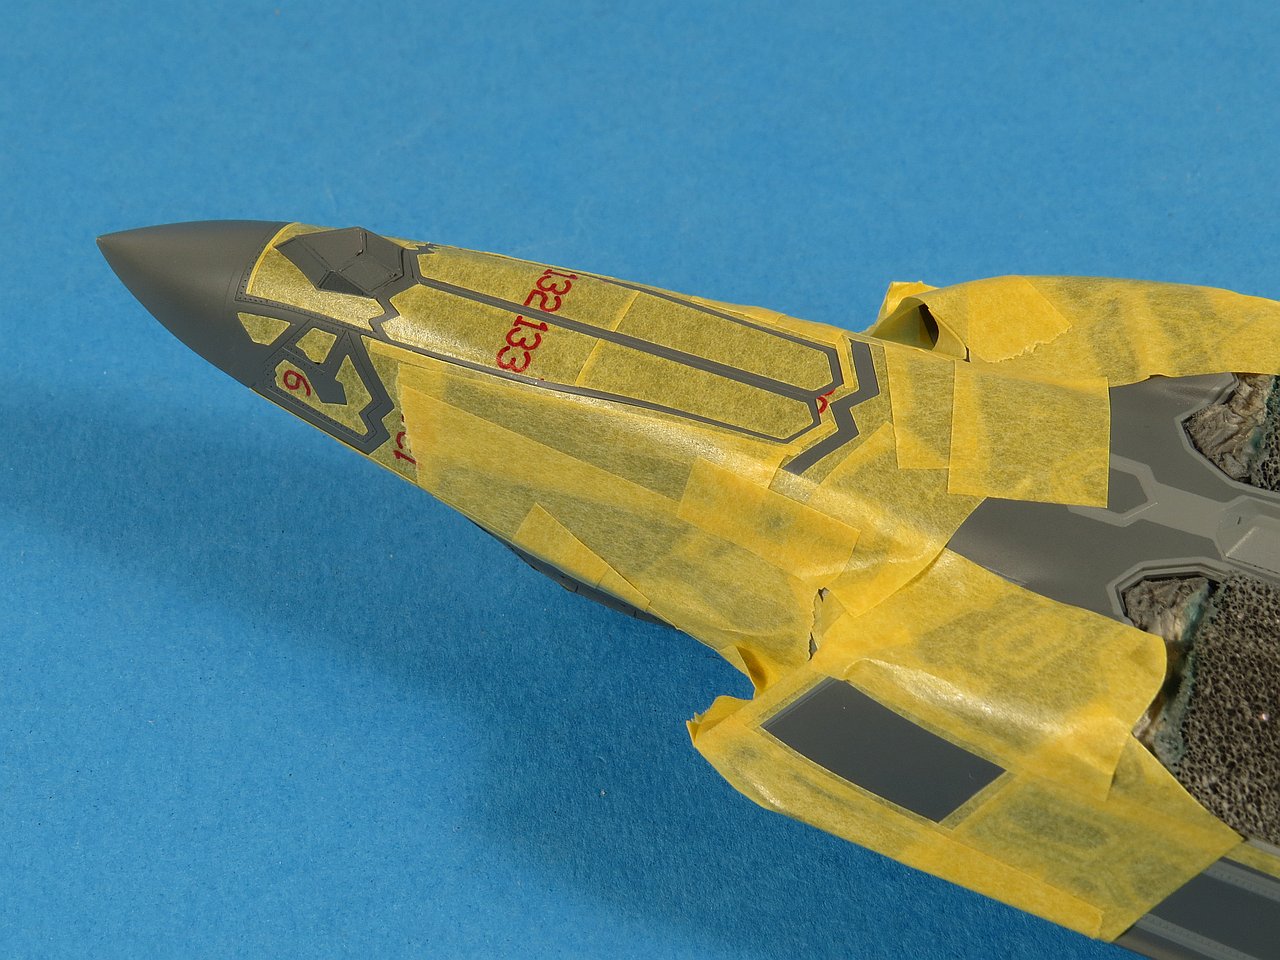
Moving now to prepare for masking and paint I used primer to check my construction and seam work. My primer of choice is Tamiya Fine Grey Primer which comes in a rattle can. I decant this using a straw into a bottle and then apply with my airbrush, giving me far more control. This paint is lacquer based and works well as a primer as the lacquer seems to lightly etch itself into the plastic resulting a super smooth and resilient base coat.


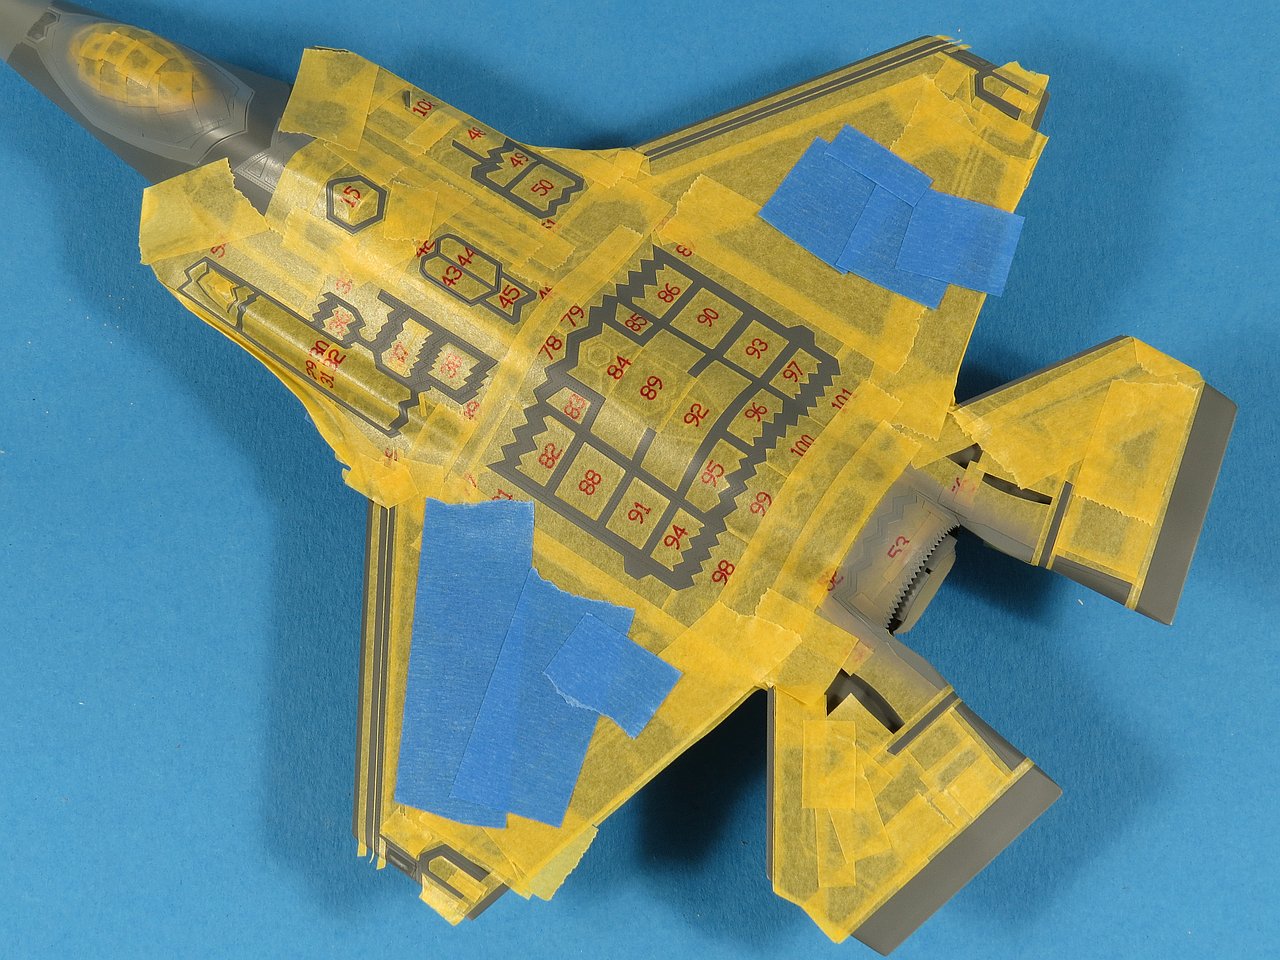
As I approached the masking stage I had some idea of how much work the RAM paneling was going to be. My initial plan was to mask all the RAM paneling myself, but as I read a few other builds online I realised that I had grossly underestimated the work involved and was therefore pleased to find a pre-cut mask set for the Meng kit made by Galaxy Models (D48003). A quick eBay search located these for sale for around US$18 in China with free postage.

Are you enjoying and finding value in this content? If so, please consider supporting my work by Buying Me A Coffee. Your support ensures that I can continue to provide high-quality, accessible content now and in the future, keeping this space free from distractions and focused entirely on the hobby we all love. Every little bit helps, and I truly appreciate your generosity!
The Galaxy Models (D48003) mask set provides precision laser cut masks made from Washi (aka Kabuki) paper tape (the same stuff used by Tamiya for their tape). Much like Tamiya tape its very flexible and forgiving so you can remove and reposition several times to get the alignment just right. The set includes masks for canopy, wheels and of course the main attraction the RAM panels.

With the masking complete all I had to do was select the right colors and start spraying, sounds easy right? Well it turned out to be anything but easy. The more photos of F-35's I looked at the more I became convinced it was a Lockheed Martin conspiracy to paint these things in a grey that was almost impossible to duplicate with any consistency. Of course photos of aircraft at different times of day and at different angles to the camera all resulted in the paint looking anything from a very warm grey to a cold blue grey. If you google for F-35 paint you will end up finding that they are all painted in a standard color, FS36170 Camouflage Grey. At the time of writing there are several model paint manufacturers that make FS36170 out of the bottle, including Mission Models, Mr Paint, Hataka etc. Many of the kit manufacturers will have you using FS36118 Gunship Grey and its the reason I included the reference photo below to sway you away from that idea.

As I had some good quality publicity photos of the RAAF aircraft, taken in what seemed like good lighting conditions I decided to settle on this grey as the basis for my paint matching. Perfect solution, no, best option I could find given I did not have physical access to my very own F-35 in the back yard, yes. With this is mind I did a bunch of test spraying using the pre-tinted FS36170 and found none of them to my liking (some were too dark, some too warm etc).

It just so happened that around this time I got my hands on some of the new Tamiya Lacquer range and while I was mucking around test spraying these I noticed that one of new greys in this range LP-13 IJN gray (Sasebo Arsenal) actually looked like a pretty close match (at least to my eyes) to what I was after. Needing to make a decision I bit the bullet and covered the Meng airframe in this color. End result, I was pretty happy with how it looked.

With the base coat down, next came the masking and then more masking and finally more masking. After I applied half of the masks to the bottom of the model I found myself wondering how I ever thought I would do this manually. If you have this kit to build, do yourself a favour and order that Galaxy Models mask set now. Stop reading this and order it, seriously :) The weapon bays were masked with some large chunks of soft foam (quick and easy). The areas in-between the pre-cut masks were filled with small sections on Tamiya tape to cater for overspray.


The next color I had to decide on was for the RAM panels themselves. Initially I settled on Dark Gull Gray FS36231 but after a couple of tests decided it needed to be a bit warmer and liked the effect I got when mixing it 50/50 with FS36170 Camouflage Grey. I happened to have both these colors in the Mr Paint range but you could mix something similar from most any paint manufacturer.

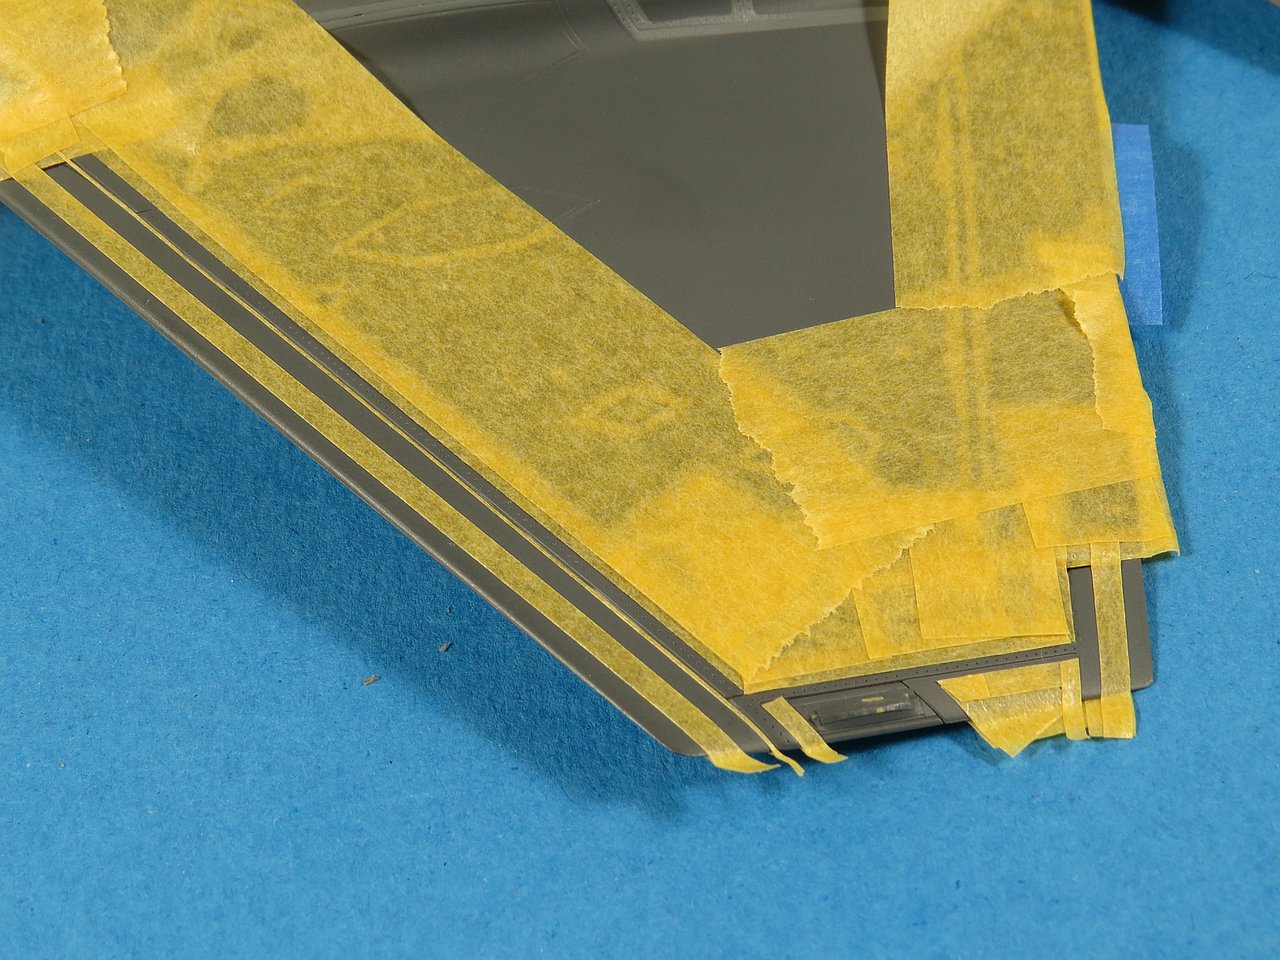
One thing to note is that the pre-cut masks do not give you everything you need to mask the whole model. In particular much of the wing leading slats and wing tip need to be masked by hand using reference photos. Likewise the tail (vertical and horizontal) needs to manually masked. I have included a bunch of close up photos below to show how I did it to save you some time.


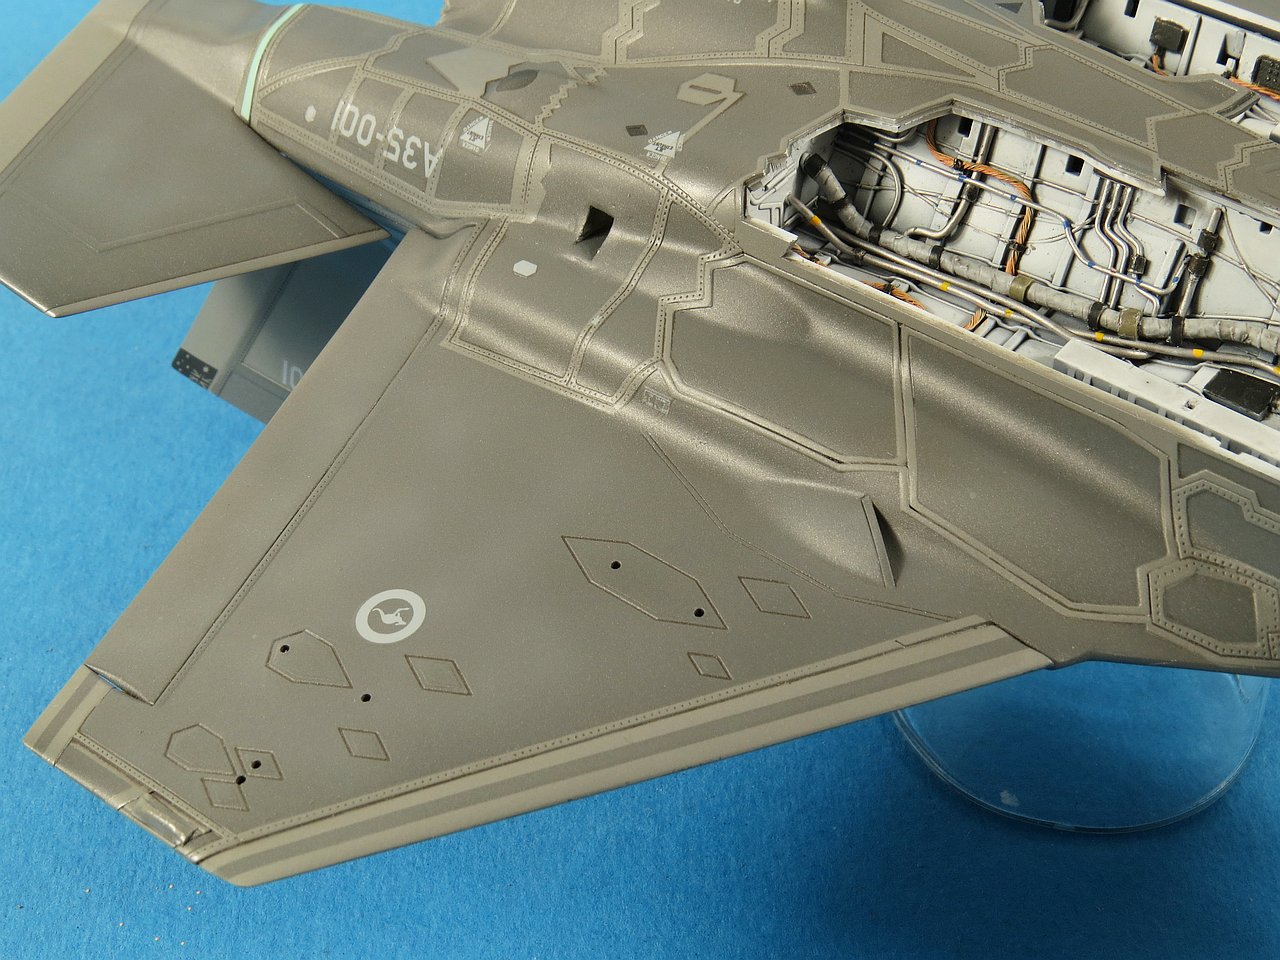
My RAM panel mix was again applied to the upper surface and the wonderful Galaxy Models masks removed (did I tell you to order those masks yet?). The pace was starting to pick up now and I was keen to get to decaling. Three light coats of Future gave me a deep solid gloss clear to protect the paint below and give the Ronin Graphics decals something to adhere to. Note how the gloss clear has considerably darkened the grey. This is normal and will lighten up once I apply the final semi-gloss Have Glass V finish.


I took the liberty of painting a couple of the wing and tail panels in the very distinctive epoxy primer color. This was just to simulate some replacement panels on the aircraft (and break up all that grey). Mr Paint has this odd color in their range as MRP-191 US NON CHROMATE EPOXY PRIMER.

The hand silk screen printed decal sheet from Ronin is physically quite small, even though you are provided with enough serial codes to do any of the RAAF's first 12 aircraft (eventually we will get 72 with an option for more). The decals are very finely printed with even the smallest stenciling being readable under sufficient magnification. Even though it might not look it here on the blue backing paper the decals colors are accurate once removed from the sheet and applied to the model.

Speaking to Steve from Ronin about the best way to apply his decals, he recommends to not use commercial setting solutions rather plain water with a few drops of mild washing detergent to act as a wetting agent. I gave this a go and it worked but I'm a long time Microscale Set and Sol user and found myself reaching for these bottles after a while just because it made me comfortable :) The decals performed perfectly, being super thin and they nestled down into the finest of detail all by themselves.


I applied the major decals first and allowed to dry overnight. I then systematically worked my way around the airframe and applied all the stencils and safety markings. I regularly checked reference photos but could not find any markings that Ronin had missed, a testament to their attention to detail. When all decals were dry I sealed them with a final coat of gloss clear (Future in my case).

The last stage of the painting was the clear coat. It was now I had to decide if I was going to attempt to tackle the Have Glass V finish seen on the F-35. From what I can tell the Have Glass system involves the addition of metallic particles to the paint to reduce the radar signature of the aircraft. When seen in photos it has that shiny, almost slimy look to it from certain angles. Several paint manufacturers have now released Have Glass clear paints and I tested the Mr Paint option but was not happy with the finish it gave. To my eye it was too matt and the suspended metallic particles too large which made them obvious when sprayed over the dark grey.

In the end (after much experimentation) I opted for a custom mix of my own using Mr Color lacquer paints. A 10:1 mix ratio of Mr Color C181 Semi Gloss clear and C8 Silver was used and heavily thinned with Mr Color Levelling Thinner. This was lightly misted onto the entire model (over the paint, RAM panels and decals). I found that about 3 coats gave a reasonable effect without becoming too noticeable.

If you have ever used Mr Color Semi Gloss clear you will know that it is anything but 'semi-gloss'. It's very glossy and so it was necessary to tone it down with some Mr Color C182 Flat Clear until I got the level of sheen I wanted. The inclusion of the Silver paint in the clear also had the expected effect of visibly lightening the grey paints it was applied over. After a bit of tweaking and adjusting I was eventually able to get a finish I was satisfied with.

With the main airframe now complete my attention returned to the addons such as weapons, pylons and of course the exhaust nozzle. It seemed I had been mixing and blending just about every color on this model so far, why stop with the nozzle. I used Mr Color C10 Copper as the base and added Red, Orange and White until I got close to the effect I wanted. Once the paint was dry I sealed it with Clear Gloss and then used a dark wash to separate the petals and highlight the details. The Galaxy Model mask set had pre-cut segments to help mask the serrated tips of the nozzle.


As noted previously in my write up, I wanted to display my model in Beast Mode with all the external pylons fitted and fully loaded. I had already prepared the weapons from various sources and now I had to paint, weather and decal them. Working with modern ordinance like LGB and JDAM bombs means a lot of tricky masking as the weapon has several components that are different in color. It means the bombs look way more interesting, it also means way more work.

The body of the bombs were first painted XF62 Olive Drab and them some weathering applied with a light oversrpay of XF60 Dark Yellow which made the Olive Drab look a tad faded. This was all then masked off and the Mr Color C308 FS36375 Light Ghost Grey components sprayed. I also opted to spray the tail unit on one of the GBU-12s in FS34095 Medium Field Green to mix things up a bit.


For the stenciling on the weapons I used a combination of those provided in the Meng weapon sets and the excellent (now out of print) Afterburner USAF Armament Decal Set Part 2 for the JDAMs and GBU-12 LGBs. After decaling and final washes I applied a generous Flat Coat to tone everything down a bit. In the end I think they look good and add that bit of interest to the otherwise monotone F-35.

CONCLUSION - Meng 1:48 F-35A Lightning II (LS-007)
Overall I think that Meng have another winner here. As a follow up to their very nice P-51D in 1/48 I think they have improved. The way they have engineered this kit makes the build super simple, the fit of the parts is excellent and the accuracy (as best I can tell based on reference photos) is spot on. Even though it took me forever to sort out my paint choices and Have Glass solution that was no fault of the kit itself, just me being an old fuddy duddy (more than usual).
I went back and looked at my initial impression in the Box Review and having now built and painted the model I believe that the RAM paneling is actually just about right for this scale.
With two Meng aircraft under my belt now I really like what they have been doing. I'm hoping they continue to work on new aircraft and that soon we hear of upcoming releases.
Are you enjoying and finding value in this content? If so, please consider supporting my work by Buying Me A Coffee. Your support ensures that I can continue to provide high-quality, accessible content now and in the future, keeping this space free from distractions and focused entirely on the hobby we all love. Every little bit helps, and I truly appreciate your generosity!
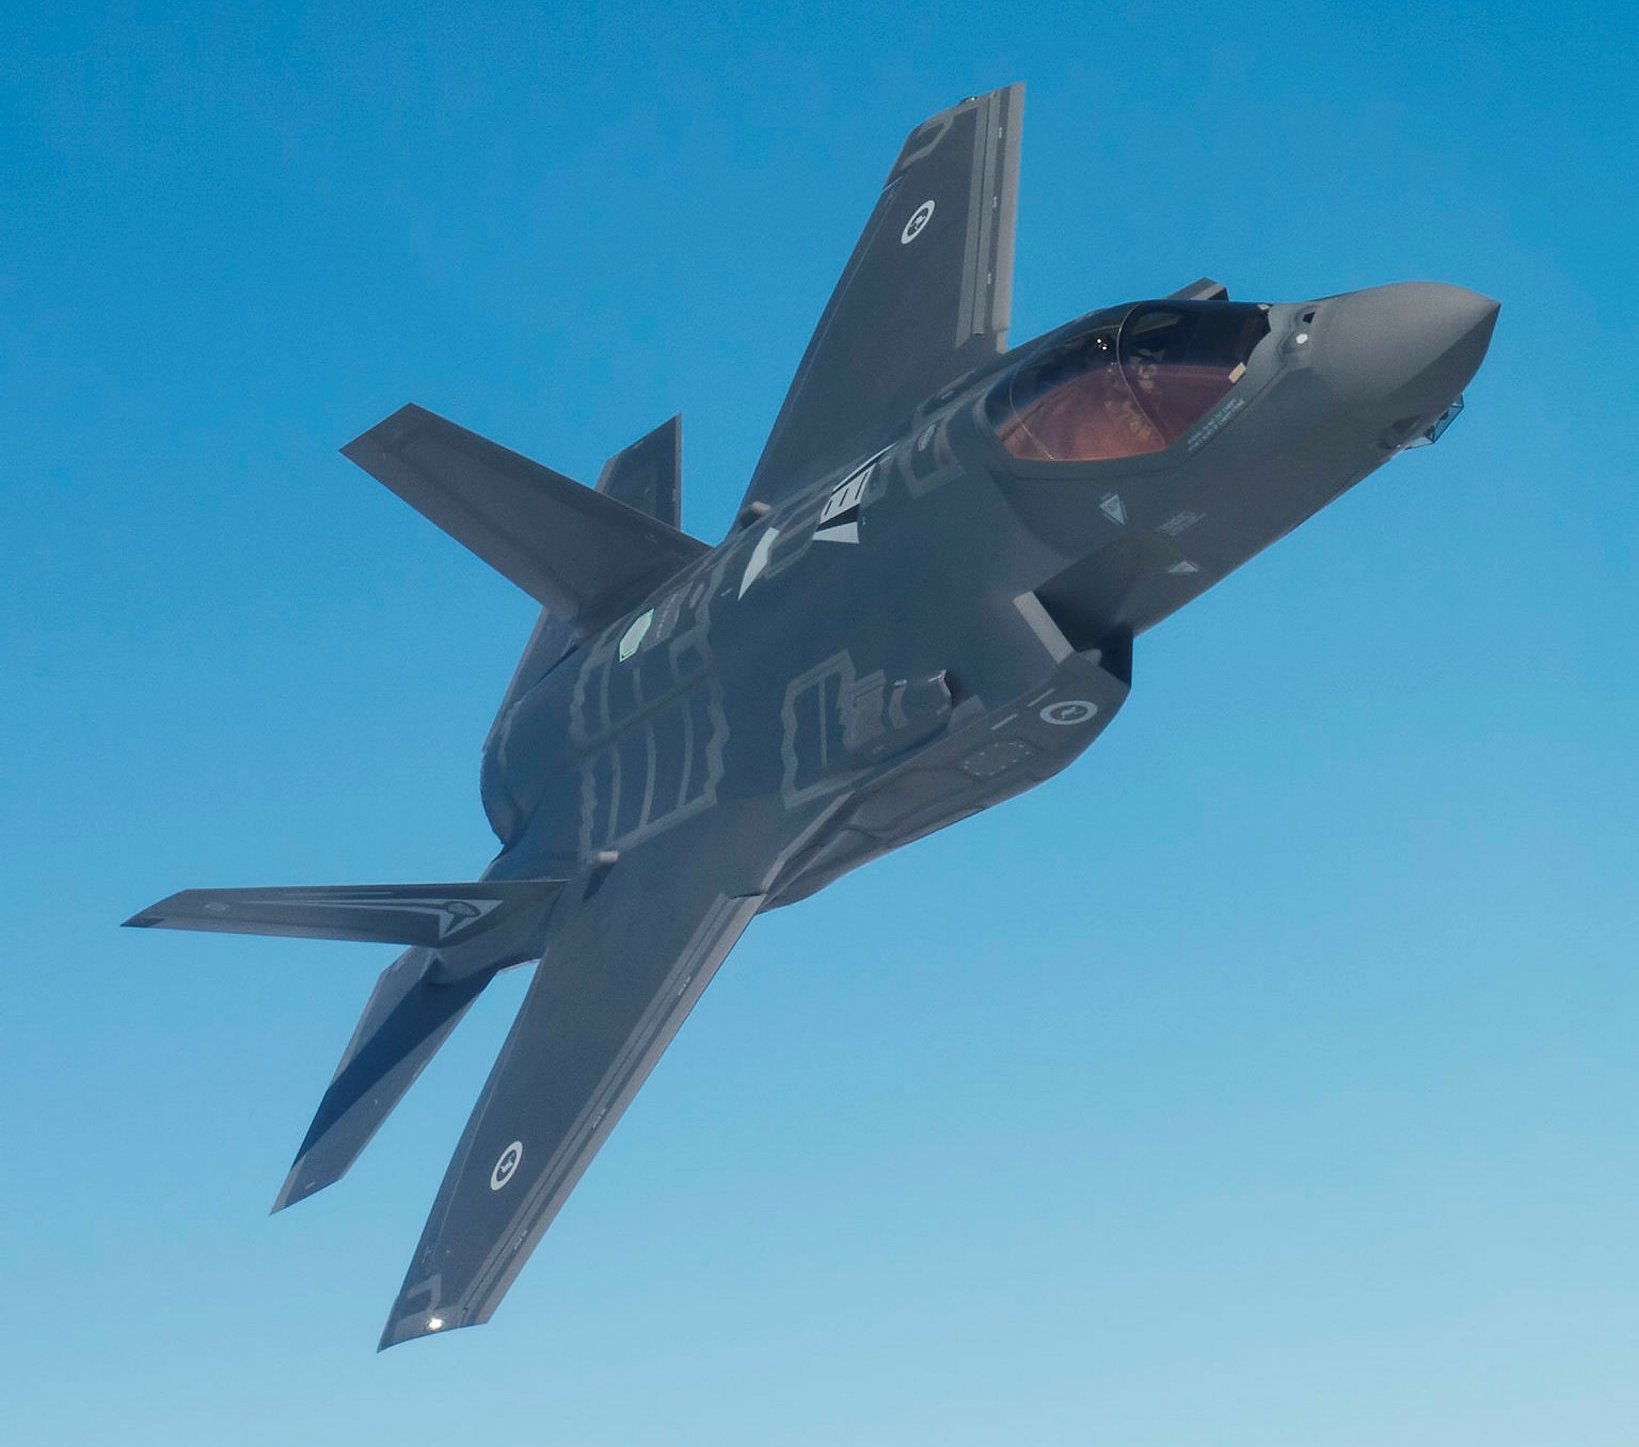
To finish off let me leave you with some photos of the finished model displayed in a tight bank to better show off all that extra work underneath. I'm happy with how it turned out and of course should I ever build another one there are things I would do differently, wouldn't we all.


